 开发手册
开发手册
# 后端开发流程
# 字典库使用
- 添加字典后都需要重启服务,然后在初始化配置中通过名称搜索添加的字典项,并更新,然后刷新页面,字典库才能正常初始化。
- 字典类型:类常量、spring service、自定义项
# 类常量使用:
- 在模块module的domain下添加
@DictItem(value = "学生", group = "type")
	public final static String STUDENT_TYPE_1 = "1";
@DictItem(value = "工程师", group = "type")
	public final static String STUDENT_TYPE_2 = "2";
2
3
4
# domain例子
public class Itstudent extends BaseDomain {

	private static final long serialVersionUID = 1L;

	@DictItem(value = "学生", group = "type")
	public final static String STUDENT_TYPE_1 = "1";
	@DictItem(value = "工程师", group = "type")
	public final static String STUDENT_TYPE_2 = "2";

	@DictItem(value="在校", group="status")
	public final static String STATUS_1 = "1";
	@DictItem(value="已毕业", group="status")
	public final static String STATUS_2 = "2";

	@Id
	@Column(length = 32)
	@GeneratedValue(generator = "uuid.hex")
	private String id;

	@Column(length = 32)
	@Comment("届数")
	private String ityearId;

	@Column(length = 32)
	@Comment("所属专业")
	private String itmajorId;

	@Column(length = 32)
	@Comment("所属班级")
	@Index
	private String itclassId;

	@Comment("学员类别")
	private String type;

	@Comment("学号")
	private String number;

	@Comment("姓名")
	private String name;

	@Comment("手机号")
	private String phone;

	//省略setter和getter方法

}
2
3
4
5
6
7
8
9
10
11
12
13
14
15
16
17
18
19
20
21
22
23
24
25
26
27
28
29
30
31
32
33
34
35
36
37
38
39
40
41
42
43
44
45
46
47
- 模块xml文件下添加字典配置项
- 指定模块类名:
- class="com.gictgict.itts.modules.org.itstudent.domain.Itstudent"
- modules指定分组:group="type"
# 模块xml配置文件例子
<dict code="org.itstudenttype" name="学员类别" class="com.gictgict.itts.modules.org.itstudent.domain.Itstudent" group="type"/>
# spring service使用
- 添加service接口
# Service例子
List<Pruser> listPruser(Map map);
# ServiceImpl例子
- 根据自己的业务需求自定义接口
@Override
	public List<Pruser> listPruser(Map map){
		return pruserRepository.list(new Query("id,name").fromMap(map), Pruser.class);
	}
2
3
4
# 模块xml配置文件例子
<dict code="pruser.list" name="人才库" memo="" service="pruserService.listPruser(Map paramMap)" key="id" value="name"/>
不填key、value默认为key="id" value="name",可以根据业务需要手动指定。
# 自定义字典
- 在项目xml文件里配置,指定key,value
# 模块xml配置文件例子
<dict code="prissue.superficialSubType" name="面上问题子类">
		<item key="0" value="聚焦责任意识"/>
		<item key="1" value="聚焦制度建设"/>
		<item key="2" value="聚焦案件处置"/>
</dict>
2
3
4
5
用户需在后台自定义字典项的情况下使用:
在后台功能业务字典模块绑定项目xml中配置的字典项


# 后台功能模块通过key获取字典库的value值
- 获取字典库中key对应的value值
- DictUtil.keyToValue(code, key)
- code表示xml文件中字典库的code
# 例子
String name = DictUtil.keyToValue("pruser.list", pruser.getId())
# 序列化生成code
- xml文件配置
- table="" 序列化字段关联的数据库表
- field="" 序列化字段名
- strategy="" 序列
- digit="" 序列化长度
# 例子
<sequence code="itstudents" name="学生" table="itts_org_itstudent" prefix="XS" field="number" strategy="increment" digit="6" sql="" memo=""/>
- 重启服务,在后台初始化配置中对序列初始化,并刷新页面
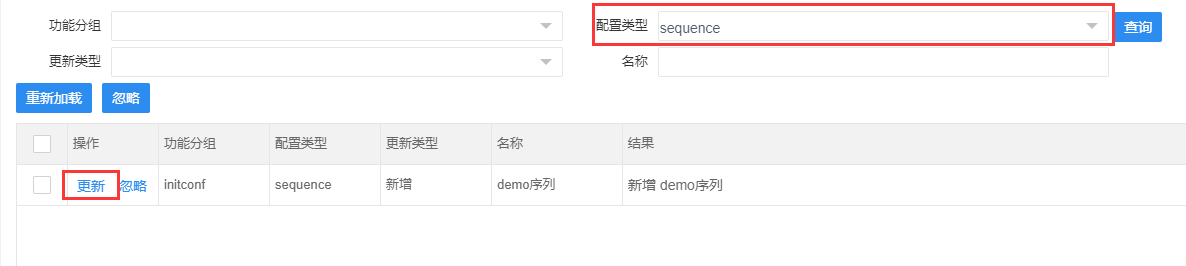
- 在create和update方法中需要手动赋值
# 例子
itstudentFromWeb.setNumber(SequenceUtil.getSequence("itstudents"));
# Query使用
# 基础查询
# 条件查询
# 字段查询
- 不指定需要查询的字段时,会返回整个对象的属性
- @param propertis 带对象别名的属性 比如:a.name query.select(String... propertis)
- 例子:
query.select("id,name,memo")
# 分组查询
- query.group(String property)
- @param property 带对象别名的属性 比如:a.goods_id 例子:
query.group("a.goods_id")
# 模糊查询
- @param column
- @param value
- 值为null时(string为null或""),组装这属性的sql条件
- 使用时value参数需要加非空判断,不然传入的value参数为null时会抛出异常:
———— org.mybatis.spring.MyBatisSystemException: nested exception is org.apache.ibatis.builder.BuilderException: The expression 'searchParameter.value' evaluated to a null value. query.like(String column, Object value) - 例子
if (goodsName != null && goodsName.length > 0) {
        query.like("c.name", goodsName);
    }
2
3
- @param column
- @param value
- 值为null时(string为null或""),不组装这属性的sql条件 query.likeEmpty(String column, Object value)
- 例子
query.likeEmpty("c.name", goodsName);
# 相等=查询
- 加入相等类型的参数
- @param column
- @param value
- 值为null时(string为null或""),组装这属性的sql条件
- 使用时value参数需要加非空判断,不然传入的value参数为null时会抛出异常:
———— org.mybatis.spring.MyBatisSystemException: nested exception is org.apache.ibatis.builder.BuilderException: The expression 'searchParameter.value' evaluated to a null value. query.eq(String column, Object value) - 例子
if (id != null && id.length > 0) {
        query.eq("id", id);
    }
2
3
- @param column
- @param value
- 值为null时(string为null或""),不组装这属性的sql条件 query.eqEmpty(String column, Object value)
- 例子
query.eqEmpty("id", id);
# <>查询
- 加入 <> 类型的参数
- @param column
- @param value
- 值为null时(string为null或""),组装这属性的sql条件
- 使用时value参数需要加非空判断,不然传入的value参数为null时会抛出异常:
———— org.mybatis.spring.MyBatisSystemException: nested exception is org.apache.ibatis.builder.BuilderException: The expression 'searchParameter.value' evaluated to a null value. query.notEq(String column, Object value) - 例子
if (id != null && id.length > 0) {
        query.notEq("id", id);
    }
2
3
- 值为null时(string为null或""),不组装这属性的sql条件 query.notEqEmpty(String column, Object value)
- 例子
query.notEqEmpty("id", id);
# >=查询
- 加入>=类型的参数
- @param column
- @param value
- 值为null时(string为null或""),组装这属性的sql条件
- 使用时value参数需要加非空判断,不然传入的value参数为null时会抛出异常:
———— org.mybatis.spring.MyBatisSystemException: nested exception is org.apache.ibatis.builder.BuilderException: The expression 'searchParameter.value' evaluated to a null value. query.ge(String column, Object value) - 例子
query.ge("availableQuantity", BigDecimal.ZERO);
- 加入>=类型的参数
- @param column
- @param value
- 值为null时(string为null或""),不组装这属性的sql条件 query.geEmpty(String column, Object value)
- 例子
query.geEmpty("availableQuantity", BigDecimal.ZERO);
# >查询
- 加入>类型的参数
- @param column
- @param value
- 值为null时(string为null或""),组装这属性的sql条件
- 使用时value参数需要加非空判断,不然传入的value参数为null时会抛出异常:
———— org.mybatis.spring.MyBatisSystemException: nested exception is org.apache.ibatis.builder.BuilderException: The expression 'searchParameter.value' evaluated to a null value. query.gt(String column, Object value) - 例子
query.gt("availableQuantity", BigDecimal.ZERO);
- 加入>类型的参数
- @param column
- @param value
- 值为null时(string为null或""),不组装这属性的sql条件 query.gtEmpty(String column, Object value)
- 例子
query.gtEmpty("availableQuantity", BigDecimal.ZERO);
# <=查询
- 加入<=类型的参数
- @param column
- @param value
- 值为null时(string为null或""),组装这属性的sql条件
- 使用时value参数需要加非空判断,不然传入的value参数为null时会抛出异常:
———— org.mybatis.spring.MyBatisSystemException: nested exception is org.apache.ibatis.builder.BuilderException: The expression 'searchParameter.value' evaluated to a null value. query.le(String column, Object value) - 例子
query.le("a.plan_delivery_time", DateUtil.completionEndTime(DateUtil.getDateString()));
- 加入<=类型的参数
- @param column
- @param value
- 值为null时(string为null或""),不组装这属性的sql条件 query.leEmpty(String column, Object value)
- 例子
query.leEmpty("a.plan_delivery_time", DateUtil.completionEndTime(DateUtil.getDateString()));
# <查询
- 加入<类型的参数
- @param column
- @param value
- 值为null时(string为null或""),组装这属性的sql条件
- 使用时value参数需要加非空判断,不然传入的value参数为null时会抛出异常:
———— org.mybatis.spring.MyBatisSystemException: nested exception is org.apache.ibatis.builder.BuilderException: The expression 'searchParameter.value' evaluated to a null value. query.lt(String column, Object value) - 例子
query.lt("a.plan_delivery_time", DateUtil.completionEndTime(DateUtil.getDateString()));
- 加入<类型的参数
- @param column
- @param value
- 值为null时(string为null或""),不组装这属性的sql条件 query.ltEmpty(String column, Object value)
- 例子
query.ltEmpty("a.plan_delivery_time", DateUtil.completionEndTime(DateUtil.getDateString()));
# 时间段查询betweenTime
- @param column 字段名
- @param startTime yyyy-MM-dd HH:mm:ss
- @param endTime yyyy-MM-dd HH:mm:ss
query.betweenTime(column, startTime, endTime)
- 例子
query.betweenTime("b.deliveryDate", DateUtil.getDateFormat().format(deliveryDateStart), DateUtil.getDateFormat().format(deliveryDateEnd));
# or查询
- 加入查询条件时,哪些是可以或的
- @param values query.or(String... values)
- 例子
public Page<Stockconvertconfig> listStockconvertconfigForPage(Map map) {
Query query = new Query("storageId,goodsId,goodstypeId,number").fromMap(map);
		String[] goodstypeIds = GoodsTypeCache.getAllChildrenIds((String)query.getValue("goodstypeId"));
		String goodsId = (String)query.getValue("goodsId");
		query.remove("a.goodstypeId");
		query.remove("a.goodsId");

		if (StringUtil.isNotBlank(goodsId)) {
			query.eq("a.goodsId", goodsId);
			query.eq("a.toGoodsId", goodsId);
			query.or("a.goodsId", "a.toGoodsId");
		}
		Page<Stockconvertconfig> page = stockconvertconfigRepository.listStockconvertconfigForPage(goodstypeIds, query.setAlias("a").order("create_time", Query.ORDER_DESC));
		return page;
		}
2
3
4
5
6
7
8
9
10
11
12
13
14
15
关联sql
Preparing:  select a.* from ims_inventory_stockconvert a WHERE ( a.goods_id = ? or a.to_goods_id = ? ) order by create_time desc limit ?,?
Parameters: 78a752e30178aa20a29d2c9180853c4b(String), 78a752e30178aa20a29d2c9180853c4b(String), 0(Integer), 20(Integer)
2
# where查询
- query.where和query.putWhereValue
- where查询
- @param condition 条件
query.where(String condition)
- 设置where(String condition),condition里的参数的value
- @param key
- @param value
query.putWhereValue(String key, Object value)
- 例子
Query query = new Query("goodstypeId,status,purchaseType,code,name,processType,isStandard,skuName").setAlias("a").fromMap(map);
        String[] goodstypeIds = GoodsTypeCache.getAllChildrenIds((String) query.getValue("goodstypeId"));
        String name = (String) query.getValue("name");
        query.remove("a.goodstypeId");
        query.remove("a.name");
        String skuName = (String) query.getValue("skuName");
        query.remove("a.skuName");

        if(StringUtil.isNotBlank(skuName)) {
    			query.where(" exists (select b.id from ims_sale_goods b where a.id = b.goods_spu_id and "
    					+ " (name like #{name} or spu like #{name} or search_code like #{name} or pinyin like #{name} or full_pinyin like #{name}) )");
    			query.putWhereValue("name", skuName);
        }
2
3
4
5
6
7
8
9
10
11
12
13
关联sql:
select a.* from ims_sale_goods_spu a where exists (select b.id from ims_sale_goods b where a.id = b.goods_spu_id and (name like ? or spu like ? or search_code like ? or pinyin like ? or full_pinyin like ? ) ) order by create_time desc limit ?,?
Parameters: %地皮菜%(String), %地皮菜%(String), %地皮菜%(String), %地皮菜%(String), %地皮菜%(String), 0(Integer), 20(Integer)
2
# not in查询
- query.notIn/query.notInEmpty
- 加入不包含类型的参数
- @param column
- @param value
- 值为null时(string为null或""),组装这属性的sql条件
- 使用时value参数需要加非空判断,不然传入的value参数为null时会抛出异常: ————— org.mybatis.spring.MyBatisSystemException: nested exception is org.apache.ibatis.builder.BuilderException: The expression 'searchParameter.value' evaluated to a null value. query.notIn(String column, Object value)
- 例子
Query query  = new Query().select("a.id").entity(Goods.class, "a").group("a.id");
		if(ids != null && ids.length > 0) {
			query.notIn("a.id", ids);
		}
		return goodsRepository.list(query, String.class);
2
3
4
5
关联sql:
select a.id from ims_sale_goods a WHERE id not in ( ? , ? )
Parameters: 74974bbc01749787dfa42c9180860177(String), 74974bbc01749787e04b2c918086018b(String)
2
- 加入不包含类型的参数
- @param column
- @param value
- 值为null时(string为null或""),不组装这属性的sql条件 query.notInEmpty(String column, Object value)
- 例子
query.notInEmpty("id", id);
# in查询
- query.in/query.inEmpty
- 加入包含类型的参数
- @param column
- @param value
- 值为null时(string为null或""),组装这属性的sql条件
- 使用时value参数需要加非空判断,不然传入的value参数为null时会抛出异常: ————— org.mybatis.spring.MyBatisSystemException: nested exception is org.apache.ibatis.builder.BuilderException: The expression 'searchParameter.value' evaluated to a null value. query.in(String column, Object value)
- 例子
Query query  = new Query().select("a.id").entity(Goods.class, "a").group("a.id");
		if(ids != null && ids.length > 0) {
			query.in("a.id", ids);
		}
		return goodsRepository.list(query, String.class);
2
3
4
5
关联sql:
select a.id from ims_sale_goods a WHERE id in ( ? , ? )
Parameters: 74974bbc01749787dfa42c9180860177(String), 74974bbc01749787e04b2c918086018b(String)
2
- 加入包含类型的参数
- @param column
- @param value
- 值为null时(string为null或""),不组装这属性的sql条件 query.inEmpty(String column, Object value)
query.inEmpty("a.id", ids)
- 排序order
- @param order 排序的字段
- @param orderType 排序的类型 (ORDER_DESC 降序/ORDER_ASC 升序)
query.order(String order, String orderType) - 例子
query.order("create_time", Query.ORDER_DESC)
# query.entity的用法:
/*
* 指定查询主表关联的实体类
*/
public Query entity(Class<?> entityClass) {
		return this.entity(entityClass, alias, null);
	}

/*
* 指定查询主表关联的实体类
* 实体类映射数据库表别名
*/
public Query entity(Class<?> entityClass, String alias) {
		return this.entity(entityClass, alias, null);
	}

/*
* 指定查询子表关联的实体类名
* 实体类映射数据库表别名
* 内连接、左连接、右连接
*/
public Query entity(Class<?> entityClass, String alias, String leftJoin) {
		return this.entity(entityClass, alias, leftJoin, null);
	}

/*
* 指定查询子表关联的实体类名
* 实体类映射数据库表别名
* 内连接、左连接、右连接,不指定默认为inner join
* 表1.关联字段1 = 表2.关联字段2
*/
public Query entity(Class<?> entityClass, String alias, String leftJoin, String on) {
		EntityClass entity = new EntityClass(entityClass, alias, leftJoin, on);
		this.entityMap.put(alias, entity);
		return this;
	}
2
3
4
5
6
7
8
9
10
11
12
13
14
15
16
17
18
19
20
21
22
23
24
25
26
27
28
29
30
31
32
33
34
35
- 多表关联查询
- 内连接查询
Query query = new Query("goodsName,planCompleteDat  e,status,createTime,storageId,source,number").setAlias("b").fromMap(map).order("a.id", Query.ORDER_DESC);

		 String goodsName = (String) query.getValue("b.goodsName");
	     query.remove("b.goodsName");
	     query.select("a.*")//.select("planCompleteDate,productlineName,number,status,source,storageId")
			.entity(ProcessItem.class, "a")
			.entity(Process.class, "b", null, "a.process_id=b.id");
	     query.likeEmpty("a.goodsName", goodsName);
2
3
4
5
6
7
8
关联sql语句:
select a.* from ims_process_process_item a inner join ims_process_process b on a.process_id=b.id order by a.id desc limit ?,?
Parameters: 0(Integer), 20(Integer)
//goodsName 有传参
select a.* from ims_process_process_item a inner join ims_process_process b on a.process_id=b.id WHERE a.goods_name like ? order by a.id desc limit ?,?
Parameters: %毛菜%(String), 0(Integer), 20(Integer)
2
3
4
5
- 左连接查询
query.entity(GoodsSpu.class, "a");
query.entity(Goods.class, "b", "left join", " a.id = b.goods_spu_id");
2
- 右连接查询
query.entity(GoodsSpu.class, "a");
query.entity(Goods.class, "b", "right join", " a.id = b.goods_spu_id");
2
# query 取值
- 默认查询select(a.*)
- .fromMap(map),前端返回searchMap,需要搜索查询的字段则在new Query("")里添加相对应的字段名称
Query query = new Query("number,productionDate,isAvailable,reportType,supplierId,source,relatePurchase,isUpload,goodsName,status").setAlias("a").fromMap(map).entity(Qcreport.class, "a").order("create_time", Query.ORDER_DESC);
- query.getValue("") 取值
- query.remove("") 移除值
- query.getValueAndRemove("") 取值并删除这值
- #{} 占位符用法,防止sql注入
Query query = new Query("number,productionDate,isAvailable,reportType,supplierId,source,relatePurchase,isUpload,goodsName,status").setAlias("a").fromMap(map).entity(Qcreport.class, "a").order("create_time", Query.ORDER_DESC);
		String goodsName = (String) query.getValueAndRemove("a.goodsName");
//		String goodsName = (String) query.getValue("a.goodsName");
		if (!StringUtils.isEmpty(goodsName)) {
			goodsName = goodsName.trim();
			query.where(" exists (select b.id from ims_qc_qcreport_item b ,ims_sale_goods c where a.id = b.qcreport_id and b.goods_id=c.id and (c.name like #{goodsName}  or c.pinyin like #{goodsName} or c.full_pinyin like #{goodsName} or c.sku like #{goodsName}  ) )");
			query.putWhereValue("goodsName", "%" + goodsName + "%");
		}
2
3
4
5
6
7
8
- 错误示范:
String goodsName = (String) query.getValue("a.goodsName");
只是取值,没有移除掉,可以看出,查询结果后面多拼接了一段"and a.goods_name like ?"
查询结果:
select
	a.*
from
	ims_qc_qcreport a
where
	exists (
	select
		b.id
	from
		ims_qc_qcreport_item b ,
		ims_sale_goods c
	where
		a.id = b.qcreport_id
		and b.goods_id = c.id
		and (c.name like ?
			or c.pinyin like ?
			or c.full_pinyin like ?
			or c.sku like ? ) )
	and a.goods_name like ?
order by
	create_time desc
limit ?,
?
Parameters: %%海天蚝油6kg%%(String),
%%海天蚝油6kg%%(String),
%%海天蚝油6kg%%(String),
%%海天蚝油6kg%%(String),
%%海天蚝油6kg%%(String),
0(Integer),
18(Integer)
2
3
4
5
6
7
8
9
10
11
12
13
14
15
16
17
18
19
20
21
22
23
24
25
26
27
28
29
30
正确做法
取值并移除掉
String goodsName = (String) query.getValueAndRemove("a.goodsName");
或者分两步
String goodsName = (String) query.getValue("a.goodsName");
query.remove("a.goodsName");
两种方式均可采用,用上述方法查询到的就是我们所需要的结果
select
	a.*
from
	ims_qc_qcreport a
where
	exists (
	select
		b.id
	from
		ims_qc_qcreport_item b ,
		ims_sale_goods c
	where
		a.id = b.qcreport_id
		and b.goods_id = c.id
		and (c.name like ?
			or c.pinyin like ?
			or c.full_pinyin like ?
			or c.sku like ? ) )
order by
	create_time desc
limit ?,
?
Parameters: %%李锦记柱候酱240g%%(String),
%%李锦记柱候酱240g%%(String),
%%李锦记柱候酱240g%%(String),
%%李锦记柱候酱240g%%(String),
0(Integer),
18(Integer)
2
3
4
5
6
7
8
9
10
11
12
13
14
15
16
17
18
19
20
21
22
23
24
25
26
27
28
# 在Repository层实现sql(自定义)
- 查询一个实体类对象
public Goods getGoodsById(String id) {
        return this.getById(id);
    }
2
3
- 添加
public Goods createGoods(Goods goods) {
        return this.create(goods);
    }
2
3
- 更新
public Goods updateGoods(Goods goods) {
        return this.update(goods);
    }
2
3
- 删除
public void deleteGoods(String... ids) {
        this.delete(ids);
    }
2
3
- 分页查询集合
public Page<Goods> listGoodsForPage(Query query) {
		return this.listForPage(query);
	}
2
3
- 查询某一张表信息
- 查询的表需要与指定的实体类相映射
public List<Goods> listGoods() {
        return this.list("select * from ims_sale_goods ",  new HashMap(), Goods.class);
    }
2
3
- 通过关联表id获取主表单条信息
public Goods getGoodsByGoodsSpuId(String goodsSpuId) {
        String sql = "select * from ims_sale_goods where goods_spu_id = #{goodsSpuId}";
        Map whereMap = new HashMap();
        whereMap.put("goodsSpuId", goodsSpuId);
        return this.get(sql, whereMap, Goods.class);
    }
2
3
4
5
6
- 通过类型id获取主表多条信息
public List<Goods> listGoodsByGoodstypeIds(String[] goodstypeIds) {
        Map whereMap = new HashMap();
        String sql = "select * from ims_sale_goods where goodstype_id in  (" + SqlUtil.in("goodstypeId", goodstypeIds,whereMap ) + ")";
        return this.list(sql, whereMap, Goods.class);
    }
2
3
4
5
- SqlUtil.in("goodstypeId", goodstypeIds,whereMap ) = #{goodstypeId0}
- whereMap = {goodstypeId0=74806fef0174823f0c5d2c9180860010}
关联sql:
select * from ims_sale_goods where goodstype_id in ( ? )
Parameters: 74806fef0174823f0c5d2c9180860010(String)
2
- map集合类型的参数
public void updateSkuBaseUnit(String goodsSpuId, String baseUnit) {
        Map whereMap = new HashMap();
        whereMap.put("goodsSpuId", goodsSpuId);
        whereMap.put("baseUnit", baseUnit);
        this.update("update ims_sale_goods set base_unit_key = #{baseUnit} where goods_spu_id = #{goodsSpuId}", whereMap);
    }
2
3
4
5
6
- 统计数量
public long countInventoryOffsetQuantityNotZero() {
		String sql = "select count(id) from ims_inventory_inventory where is_default_storage = #{isDefaultStorage}";
		Map whereMap = new HashMap();
        whereMap.put("isDefaultStorage", "1");
		return this.count(sql, whereMap);
	}
2
3
4
5
6
# 导出
- 前台需调用导出
- exportReport第一个参数是code,code+"ReportBuilder"取得后台的ReportBuilder类
第二个参数为parametersFromWeb 传给后台的参数
this.$api.exportReport('Pruser', this.searchMap)
- 使用后台直接导出excel
- 后台新建一个ReportBuilder的类,继承ReportBuilderSupport类
- 重写 buildReport,构建Report对象
# 三种实现方式:
# 使用addTableColumn来定义列,不使用property(推荐使用)
@Component("PruserReportBuilder")
public class PruserReportBuilder extends ReportBuilderSupport {

	@Autowired
	private IPruserService pruserService;

	@Override
	protected void buildReport(Report report, Map<String, Object> parametersFromWeb, Page page) {
		report.getCurrentTab().setName("人才库信息");
		List<Pruser> list = pruserService.listPruser(PrmsUtil.initSearchMap(parametersFromWeb, 1, 10));
		Table table = report.newTable();
		table.setPage(page);
		table.setTitle("人才库")
				.addTableColumn("名称", 150)
				.addTableColumn("登录账号", 150)
				.addTableColumn("手机", 180 )
				.addTableColumn("邮箱", 180 )
				.addTableColumn("QQ", 150)
				.addTableColumn("微信", 200)
				.addTableColumn("启用状态", 200)
		        .addTableColumn("类别", 150);
		if (list.isEmpty()) {
			table.next();
		} else {
			for (Pruser vo : list) {
				table.next();
				table.addTableCell(vo.getName());
				table.addTableCell(vo.getLoginId());
				table.addTableCell(vo.getPhone());
				table.addTableCell(vo.getEmail());
				table.addTableCell(vo.getQq());
				table.addTableCell(vo.getWechat());
				table.addTableCell(DictUtil.keyToValue("common.enableStatus", vo.getStatus()));
				table.addTableCell(DictUtil.keyToValue("pruser.type", vo.getType()));
			}
		}
	}
	@Override
	protected String getTemplateType() {
		return null;
	}

	@Override
	protected String getName() {
		return "人才库信息导出" + DateUtil.getDateTimeNoSeparatorFormat().format(new Date());
	}
}
2
3
4
5
6
7
8
9
10
11
12
13
14
15
16
17
18
19
20
21
22
23
24
25
26
27
28
29
30
31
32
33
34
35
36
37
38
39
40
41
42
43
44
45
46
47
- 初始化searchMap工具类PrmsUtil(根据自己的项目命名)
public class PrmsUtil {

public static Map initSearchMap(Map<String, Object> params, Page page, int pageSize) {
		Integer pageIndex = 1;
		if (page != null) {
			/*if (page.getSize() > 0) {
				pageSize = page.getSize();
			}*/
			if (page.getIndex() > 0) {
				pageIndex = page.getIndex();
			}
		}
		return initSearchMap(params, pageSize, pageIndex);
	}

	/**
	 * 初始化searchMap
	 * @param params
	 * @param pageSize
	 * @param pageIndex
	 * @return
	 */
	public static Map initSearchMap(Map params, Integer pageSize, Integer pageIndex) {
		Map<String, Object> queryMap = new HashMap();
		queryMap.put("searchMap", params != null ? params : Collections.EMPTY_MAP);
		if (pageSize != null) {
			if (pageIndex == null) {
				pageIndex = 1;
			}
			queryMap.put("page", initPage(pageIndex, pageSize));
		}
	    return queryMap;
	}

	/**
	 * 初始化searchMap
	 * @param params
	 * @return
	 */
	public static Map initSearchMap(Map params) {
		return initSearchMap(params, null, null);
	}

	private static Map initPage(int index, int pageSize) {
		Map<String, Object> pageMap = new HashMap();
        pageMap.put("index", index);
        pageMap.put("size", pageSize);
		return pageMap;
	}
}
2
3
4
5
6
7
8
9
10
11
12
13
14
15
16
17
18
19
20
21
22
23
24
25
26
27
28
29
30
31
32
33
34
35
36
37
38
39
40
41
42
43
44
45
46
47
48
49
50
# 使用addTableColumn来定义列
/**
 * 使用类来定义列
 *
 */
@Component("Pruser1ReportBuilder")
public class Pruser1ReportBuilder  extends ReportBuilderSupport{

	@Autowired
	private IPruserService pruserService;


	@Override
	protected void buildReport(Report report, Map<String, Object> parametersFromWeb, Page page) {
		Table table = report.newTable();
		List<Map> datas = getDatas(parametersFromWeb);
		table.setTitle("人才库信息")
				.addTableColumn("名称", "name")
				.addTableColumn("登录账号", "loginId")
				.addTableColumn("手机", "phone")
				.addTableColumn("邮箱", "email")
				.addTableColumn("QQ", "qq")
				.addTableColumn("微信", "wechat")
				.addTableColumn("启用状态", "status")
				.addTableColumn("类别", "type")
				.addTableColumn("性别", "sex")
				.setDatas(datas);
	}

	private List<Map> getDatas(Map<String, Object> parametersFromWeb) {
		List<Pruser> list = pruserService.listPruser(PrmsUtil.initSearchMap(parametersFromWeb, null, null));
		List<Map> testReports = new ArrayList();
		for(Pruser vo : list) {
			Map testReport = new HashMap();
			testReport.put("name",vo.getName());
			testReport.put("loginId",vo.getLoginId());
			testReport.put("phone",vo.getPhone());
			testReport.put("email",vo.getEmail());
			testReport.put("qq",vo.getQq());
			testReport.put("wechat",vo.getWechat());
			testReport.put("status",DictUtil.keyToValue("common.enableStatus", vo.getStatus()));
			testReport.put("type",DictUtil.keyToValue("pruser.type", vo.getType()));
			testReport.put("sex",DictUtil.keyToValue("person.sex", vo.getSex()));
			testReports.add(testReport);

		}
		return testReports;
	}

	@Override
	protected String getName() {
		return "人才库信息导出" + DateUtil.getDateTimeNoSeparatorFormat().format(new Date());
	}

	@Override
	protected String getTemplateType() {
		return null;
	}

	}
2
3
4
5
6
7
8
9
10
11
12
13
14
15
16
17
18
19
20
21
22
23
24
25
26
27
28
29
30
31
32
33
34
35
36
37
38
39
40
41
42
43
44
45
46
47
48
49
50
51
52
53
54
55
56
57
58
59
# 使用类和注解来定义列的例子
/**
 * 使用类来定义列
 *
 */
@Component("Pruser2ReportBuilder")
public class Pruser2ReportBuilder extends ReportBuilderSupport {

	@Autowired
	private IPruserService pruserService;

	@Override
	protected void buildReport(Report report, Map<String, Object> parametersFromWeb, Page page) {
		List<TestReport> datas = getDatas(parametersFromWeb);
		Table table = report.newTable();
		table.setTitle("人才库导出").build(TestReport.class).setDatas(datas);
	}

	private List<TestReport> getDatas(Map<String, Object> parametersFromWeb) {
		List<Pruser> list = pruserService.listPruser(PrmsUtil.initSearchMap(parametersFromWeb, null, null));
		List<TestReport> testReports = new ArrayList();
		for(Pruser vo : list) {
			TestReport testReport = new TestReport();
			testReport.setName(vo.getName());
			testReport.setLoginId(vo.getLoginId());
			testReport.setPhone(vo.getPhone());
			testReport.setEmail(vo.getEmail());
			testReport.setQq(vo.getQq());
			testReport.setWechat(vo.getWechat());
			testReport.setStatus(DictUtil.keyToValue("common.enableStatus", vo.getStatus()));
			testReport.setType(DictUtil.keyToValue("pruser.type", vo.getType()));
			testReport.setSex(DictUtil.keyToValue("person.sex", vo.getSex()));
			testReports.add(testReport);

		}

		return testReports;
	}

	@Override
	protected String getName() {
		return "人才库导出" + DateUtil.getDateTimeNoSeparatorFormat().format(new Date());
	}

	@Override
	protected String getTemplateType() {
		return null;
	}

	class TestReport implements Serializable {
		@ReportColumn(value = "名称", search = ReportColumn.SEARCH_INPUT)
		private String name;

		@ReportColumn(title = "登录账号", search = ReportColumn.SEARCH_INPUT)
		private String loginId;

		@ReportColumn(title = "手机", width = 50, search = ReportColumn.SEARCH_INPUT)
		private String phone;

		@ReportColumn(title = "邮箱", search = ReportColumn.SEARCH_INPUT)
		private String email;

		@ReportColumn(title = "QQ", search = ReportColumn.SEARCH_INPUT)
		private String qq;

		@ReportColumn(title = "微信", search = ReportColumn.SEARCH_INPUT)
		private String wechat;

		@ReportColumn(title = "启用状态")
		@DictCode("common.enableStatus")
		private String status;

		@ReportColumn(title = "类别")
		@DictCode("pruser.type")
		private String type;

		@ReportColumn(title = "性别")
		@DictCode("person.sex")
		private String sex;

		@ReportColumn(title = "操作", width = 500, froze = ReportColumn.FROZE_RIGHT, type = ReportColumn.TYPE_BUTTON, template = "{'url':'111'}")
		private String opeartoin;

        //注:省略setter和getter方法

	}
}
2
3
4
5
6
7
8
9
10
11
12
13
14
15
16
17
18
19
20
21
22
23
24
25
26
27
28
29
30
31
32
33
34
35
36
37
38
39
40
41
42
43
44
45
46
47
48
49
50
51
52
53
54
55
56
57
58
59
60
61
62
63
64
65
66
67
68
69
70
71
72
73
74
75
76
77
78
79
80
81
82
83
84
85
86
# 导入
- 添加导入按钮
- 按钮权限添加 permission="prissuesample.save"
<mt-tab>
        <mt-tab-button-item>
            <mt-button id="uploadButton" icon="upload" @click="initUploadPrissuesample" permission="prissuesample.save">导入</mt-button>
        </mt-tab-button-item>
<mt-tab>
2
3
4
5
- 数据定义
 data() {
        return {
            prissuesampleData: 'prissuesampleData'
        };
    },
2
3
4
5
- 上传页面
<mt-show ref="fileUpload" width="300" height="250" title="问题导入">
        <file-list moduleCode="prissuesampleData" @success="uploadPrissuesample" :objectId="prissuesampleData" height="450" :showList=false :permission="{delete: true, upload: true} " />
</mt-show>
2
3
- 按钮点击弹出上传页面
initUploadPrissuesample() {
            this.$refs.fileUpload.show()
        },
2
3
- 上传成功后调用方法
uploadPrissuesample(fileIds) {
            this.$refs.fileUpload.close()
            this.$ajax
                .post(
                    this.$mtsampleAdmin + "/prissuesample/uploadData",
                    { fileIds: fileIds }
                )
                .then(result => {
                    if (result.success) {
                        this.$message.toast(result.message);
                        if (result.list.length > 0) {
                            this.$refs.importerShow.show(result.list)
                        } else {
                            this.list()
                        }
                    } else {
                        this.$message.error(result.message);
                    }
                });
        }
2
3
4
5
6
7
8
9
10
11
12
13
14
15
16
17
18
19
20
- 引入错误信息提示页面
<mt-show height="standard" width="standard" title="导入信息">
        <importer-show ref="importerShow" @list="list"/>
</mt-show>
2
3
- 注册错误信息提示页面
import ImporterShow from "./importInfo-show";
components: {
        ImporterShow
    }
2
3
4
- 错误信息提示页面importer-show
<template>
    <mt-show-content title="导入未成功">
        <mt-toolbar :cssstyle="{postion: 'bottom',textalign: 'right'}">
            <mt-button id="closeButton" icon="close" @click="_closeExcelError()" type="normal">关闭</mt-button>
        </mt-toolbar>

        <!--excel导入信息-->
        <mt-card>
            <mt-list-table :listData="infos" ref="excelErrorData" v-slot="model" :restHeight="320" :showIndex="true" :showSelect="false">
                <mt-column property="tableName" title="sheet表名" width="110" />
                <mt-column property="name" title="字段标题" width="200"/>
                <mt-column property="rowCol" title="excel位置" width="150">
                    第{{ model.row }}行<template v-if="model.col > 0 ">,第{{ model.col }}列</template>
                </mt-column>
                <mt-column property="orginalValue" title="原值" width="200" />
                <mt-column property="message" title="错误信息" width="400" />
            </mt-list-table>
        </mt-card>

    </mt-show-content>
</template>

<script>
export default {
    name: "importInfoShow",
    data() {
        return {
            infos: [],
        };
    },
    methods: {
        show(data) {
            this.infos = data
            this.$parent.show();
        },
        _closeExcelError() {
            this.$parent.close();
        },
    }
}
</script>

<style scoped>

</style>
2
3
4
5
6
7
8
9
10
11
12
13
14
15
16
17
18
19
20
21
22
23
24
25
26
27
28
29
30
31
32
33
34
35
36
37
38
39
40
41
42
43
44
45
# 模板类excelDto例子
- 后台接口定义
- 模板解析
- dto下添加模板类excelDto
- 参数定义:
- form.newSheet("问题模板", "prissuesample");
- 第一个参数需要与导入excel模板左下角工作表的名称一致
- 第二个参数为业务module
- form.getCurrentSheet() 读取表格
- .add("名称", "name", form.notNull())
- 字段名称需要与导入模板的表格名称一致
- form.notNull() 校验行不为Null
- form.dict("字典code") 字典库key、value值校验
- form.custom(自定义map) 自定义map key、value值校验
- 下拉框数据源为其它模块module,需要通过excel表的name绑定关联id,导入后直接在下拉框中选中;可按照下列方式传入自定义的map。
Map pruserMap = pruserService.listPruser(java.util.Collections.EMPTY_MAP).stream()
					.collect(Collectors.toMap(Pruser::getId, v -> v.getName()));
2
public class PrissuesampleExcelDto extends BaseExcel {

	private static final long serialVersionUID = 1L;

	private String id;

	private String practivityId;

	private String prunitId;

	private String name;

	private String number;

	private String content;

	private String superficialType;

	private String superficialSubType;

	private String fromMode;//1.0

	private String submitterId;

	private String submitTime;

	private String auditStatus;//0 未审核,1 已审核

	private String auditorId;

	private String auditOpinion;

	private String level;//1.0

	private String type;//1.0

	private String rectificationType;//

	private String tags;//

	private Integer count;

	private Integer rectificationDeadline;

	private String rectificationMeasure;

	private Float showOrder;

	@Comment("备注")
	private String memo;

	public static void init(ImportExcelForm form, Map pruserMap, Map prissuetypeMap, Map practivityMap, Map prunitMap) {

		form.newSheet("问题模板", "prissuesample");
 		form.getCurrentSheet()
 		.add("巡察活动id", "practivityId", form.notNull(), form.custom(practivityMap))
 		.add("巡察对象id", "prunitId", form.notNull(), form.custom(prunitMap))
 		.add("名称", "name", form.notNull())
 		.add("编号", "number", form.notNull())
 		.add("内容", "content", form.notNull())
 		.add("面上问题类别", "superficialType", form.notNull())
 		.add("面上问题子类", "superficialSubType", form.notNull())
 		.add("来源方式", "fromMode", form.notNull())
 		.add("提交人id", "submitterId", form.notNull(), form.custom(pruserMap))
 		.add("提交时间", "submitTime", form.notNull())
 		.add("审核状态", "auditStatus", form.notNull())
 		.add("审核人id", "auditorId", form.notNull(), form.custom(pruserMap))
 		.add("审核意见", "auditOpinion", form.notNull())
 		.add("问题等级", "level", form.notNull())
 		.add("问题类别", "type", form.notNull(), form.custom(prissuetypeMap))
 		.add("整改类别", "rectificationType", form.notNull())
 		.add("问题标签", "tags", form.notNull())
 		.add("数量", "count", form.notNull())
 		.add("整改期限", "rectificationDeadline", form.notNull())
 		.add("整改措施", "rectificationMeasure", form.notNull())
// 		.add("启用状态", "status", form.notNull(), form.dict("common.enableStatus"))
 		.add("备注", "memo");

	}
	//省略getter、setter方法
2
3
4
5
6
7
8
9
10
11
12
13
14
15
16
17
18
19
20
21
22
23
24
25
26
27
28
29
30
31
32
33
34
35
36
37
38
39
40
41
42
43
44
45
46
47
48
49
50
51
52
53
54
55
56
57
58
59
60
61
62
63
64
65
66
67
68
69
70
71
72
73
74
75
76
77
78
79
80
# Controller例子
@PostMapping("/uploadData")
	@ResponseBody
	public String uploadData(@RequestBody Map map) {
		List<String> fileIdList = (List<String>)map.get("fileIds");
		String[] fileIds = fileIdList.toArray(new String[fileIdList.size()]);
		List<ExcelResult> list = prissuesampleService.uploadData(fileIds);
		Json json = this.newJson();
		this.setList(json, list, a -> new Json().copy(a, "orginalValue,value,name,tableName,message,row,col"));
		return json.setSuccessMessage("数据上传成功,请检查").toJsonString();
	}
2
3
4
5
6
7
8
9
10
# Servcie例子
//导入数据
	List<ExcelResult> uploadData(String[] fileIds);
2
# ServiceImpl例子
@Override
	@Transactional(rollbackFor = Exception.class)
	public List<ExcelResult> uploadData(String[] fileIds) {
		List<ExcelResult> resultList = java.util.Collections.EMPTY_LIST;
		if (fileIds.length > 0) {
			String fileId = fileIds[0];
			File file = fileService.getFileById(fileId).block();
			if (file == null) {
				throw new BusinessException("该文件不存在");
			}

			ImportExcelForm form = new ImportExcelForm(file.getDistPath(), file.getDistFileName());

			//dto模板文件如果添加了form.custom(map)校验,可自定义map,传入模板中校验。
			//下拉框为其它模块module,需要通过excel表的name绑定关联id,导入后直接在下拉框中选中;可按照下列方式传入id。
			Map pruserMap = pruserService.listPruser(java.util.Collections.EMPTY_MAP).stream()
					.collect(Collectors.toMap(Pruser::getId, v -> v.getName()));

				form.newSheet("问题模板", "prissuesample");
				PrissuesampleExcelDto.init(form, pruserMap);

			//读取excel表格获取到的列表信息
			List<PrissuesampleExcelDto> list = form.readExcelSheet(PrissuesampleExcelDto.class);
			//dto层校验错误返回的结果集
			resultList = form.getErrorList();

			if (resultList.isEmpty()) {

				if (list.isEmpty()) {
					throw new BusinessException("未读取到有效的数据记录!");
				}
				// 数据校验与转换
				resultList = new ArrayList();
				ExcelResult excelResult = null;
				PrissuesampleExcelDto prissuesampleExeclDto = null;

				// 表格内的数据查重
				//校验巡察对对象、巡察活动都一致、则为重复
				Map<String, List<PrissuesampleExcelDto>> dtoMap = list.parallelStream()
						.collect(Collectors.groupingBy(PrissuesampleExcelDto::getPrissueKeyId));
				List<PrissuesampleExcelDto> tempList = null;
				for (Iterator it = dtoMap.keySet().iterator(); it.hasNext();) {
					String key = (String) it.next();
					tempList = dtoMap.get(key);
					if (tempList.size() > 1) {
						prissuesampleExeclDto = tempList.get(0);
						excelResult = new ExcelResult();
						excelResult.setRow(prissuesampleExeclDto.getRowIndex());
						excelResult.setTableName(prissuesampleExeclDto.getSheetName());
						excelResult.setName("巡察对象、巡察活动");
						excelResult.setOrginalValue(DictUtil.keyToValue("practivity.list", prissuesampleExeclDto.getPractivityId())+"、"+DictUtil.keyToValue("prunit.search", prissuesampleExeclDto.getPrunitId()));
						excelResult.setMessage(String.format("巡察对象、巡察活动重复在 第 %s 行",
								tempList.stream().map(PrissuesampleExcelDto::getRowIndex).collect(Collectors.toSet()).stream()
										.map(String::valueOf).collect(Collectors.joining(",", "[", "]"))));
						resultList.add(excelResult);
					}
				}
				dtoMap.clear();
				dtoMap = null;

				//表格信息无重复,执行相关业务操作
				if (resultList.isEmpty()) {
					/*
					* 已获取到列表信息list
					* 执行相关业务逻辑
					*/
				}
			}
		}
		return resultList;
	}
2
3
4
5
6
7
8
9
10
11
12
13
14
15
16
17
18
19
20
21
22
23
24
25
26
27
28
29
30
31
32
33
34
35
36
37
38
39
40
41
42
43
44
45
46
47
48
49
50
51
52
53
54
55
56
57
58
59
60
61
62
63
64
65
66
67
68
69
70
71
# 权限配置
# 按钮权限
- 以下例子:moduleCode为prissuesample,operationCode为upload
- 模块xml配置文件
<?xml version="1.0" encoding="UTF-8"?>
<config>
	<group code="prissuesample">
		<menu parentCode="prms" code="prissuesample" name="问题sample" url="/prissuesample/list" resources="prissuesample.upload"/>

		<module code="prissuesample" name="问题">
			<operation code="upload" name="导入" enable="true" filter="true" permission="upload"/>
		</module>

	</group>
</config>
2
3
4
5
6
7
8
9
10
11
- 前端按钮指定关联的permission=""
<mt-button id="uploadButton" icon="upload" @click="initUploadPrissuesample" permission="prissuesample.upload">导入</mt-button>
# 模块、菜单权限
- 以下例1:moduleCode为itdevice,operationCode为alarm
- 以下例2:moduleCode为prguide,operationCode为prguideStep
- 公用组件上权限参数为permission,支持permission的公用组件:Button,Card,ListColumn,SearchItem,ShowTableItem
# xml配置文件例子1
- parentCode="" 指定全局xml文件中配置的父级菜单关联项
- url="" 前端展示页面的关联路径
- resources="moduleCode + operationCode"
<?xml version="1.0" encoding="UTF-8"?>
<config>
	<group code="itdevice">
		<menu parentCode="itts_device" code="itdevice" name="设备管理" url="/itdevice/itdevice/list" resources="itdevice,itdevice.save,itdevice.delete,itdevice.search"/>
		<menu parentCode="itts_device" code="itdevice_alarm" name="设备报警" url="/itdevice/itdevice/list-alarm" resources="itdevice.alarm"/>
		<module code="itdevice" name="设备">
			<operation code="save" name="保存" enable="true" filter="true" permission="getById,create,update"/>
			<operation code="delete" name="删除" enable="true" filter="true" permission="delete"/>
			<operation code="search" name="查询" enable="true" filter="true" permission="list,getById"/>
			<operation code="alarm" name="设备报警" enable="true" filter="true" permission="listAlarmDeviceLog,sendAlarmLog"/>
		</module>
	</group>
</config>
2
3
4
5
6
7
8
9
10
11
12
13
# xml配置文件例子2
<?xml version="1.0" encoding="UTF-8"?>
<config>
	<group code="prguide">
		<menu parentCode="prms_prguide" code="prguide" name="流程指引" url="/prguide/list" resources="prguide,prguide.save,prguide.delete,prguide.search"/>
		<menu parentCode="prms_prguide" code="prguideStep" name="流程指引阶段" url="/prguide/prguidestep-list" resources="prguide.prguideStep"/>
		<module code="prguide" name="流程指引">
			<operation code="save" name="保存" enable="true" filter="true" permission="getById,create,update"/>
			<operation code="delete" name="删除" enable="true" filter="true" permission="delete"/>
			<operation code="search" name="查询" enable="true" filter="true" permission="list,getById"/>
			<operation code="prguideStep" name="流程指引阶段" enable="true" filter="true" permission="listPrguideStep"/>
		</module>
	</group>
</config>
2
3
4
5
6
7
8
9
10
11
12
13
# 缓存
- 缓存类例子:
package com.gictgict.wsos.cache;

import java.util.List;
import java.util.Map;
import java.util.concurrent.ConcurrentHashMap;
import java.util.concurrent.locks.Lock;
import java.util.concurrent.locks.ReentrantLock;
import java.util.stream.Collectors;

import com.freeworld.cache.Cache;
import com.freeworld.cache.CacheFactory;
import com.freeworld.util.IocUtil;
import com.freeworld.util.StringUtil;
import com.gictgict.wsos.modules.wsgoods.domain.Wsgoods;
import com.gictgict.wsos.modules.wsgoods.service.IWsgoodsService;
import com.helpfulzoo.mtbase.modules.dict.DictUtil;

@SuppressWarnings({ "unchecked", "raws" })
public class WsgoodsCache {

	private static Cache wsgoodsCache = (Cache) CacheFactory.getCache("wsgoodsCache");
	public static final String LAST_FLUSH_KEY = "last_flush_";
	private static long LAST_FLUSH_TIME = 0l;
	private static Lock lock = new ReentrantLock();
	private static Integer expireTime = 24 * 24 * 60;
	private static Map<String,Wsgoods> goodsKeyIdMap = new ConcurrentHashMap<String, Wsgoods>();

	private static IWsgoodsService wsgoodsService = (IWsgoodsService)IocUtil.getBean("wsgoodsService");


	private static void initCache() {
		//加锁
		try {
			lock.lock();

			if (verifyTime()) {//这里再次验证
				List<Wsgoods> list = wsgoodsService.listAllWsgoodss();
				goodsKeyIdMap.clear();

				if (!list.isEmpty()) {
					for (Wsgoods vo : list) {
						vo.setTypeName(DictUtil.keyToValue("wsgoods.type", vo.getType()));
						goodsKeyIdMap.put(vo.getId(), vo);
					}
				}

				LAST_FLUSH_TIME = System.currentTimeMillis();
				wsgoodsCache.put(LAST_FLUSH_KEY, LAST_FLUSH_TIME, expireTime);

			}

		} finally {
			lock.unlock();
		}
	}

	private static boolean verifyTime() {
		if (LAST_FLUSH_TIME == 0l) {
			return true;
		} else {
			Long REMOTE_LAST_FLUSH_TIME = wsgoodsCache.get(LAST_FLUSH_KEY, Long.class);
			return REMOTE_LAST_FLUSH_TIME == null || LAST_FLUSH_TIME != REMOTE_LAST_FLUSH_TIME.longValue();
		}
	}

	private static void verify() {
		if (verifyTime()) {
			initCache();
		}
	}

	public static Wsgoods getWsgoodsById(String id) {
		if (StringUtil.isBlank(id)) {
			return null;
		}
		verify();
		return goodsKeyIdMap.get(id);
	}

	public static List<Wsgoods> listWsgoods() {
		verify();
		return goodsKeyIdMap.values().stream().collect(Collectors.toList());
	}
}
2
3
4
5
6
7
8
9
10
11
12
13
14
15
16
17
18
19
20
21
22
23
24
25
26
27
28
29
30
31
32
33
34
35
36
37
38
39
40
41
42
43
44
45
46
47
48
49
50
51
52
53
54
55
56
57
58
59
60
61
62
63
64
65
66
67
68
69
70
71
72
73
74
75
76
77
78
79
80
81
82
83
84
85
- 定义spring service字典库
<dict code="wsgoods" name="物品" memo="" service="wsgoodsService.listWsgoods(Map paramMap)" key="id" value="name"/>
- 自定义业务接口
@Override
	public List<Wsgoods> listWsgoods(Map map){
		return wsgoodsRepository.list(new Query("id,name").fromMap(map), Wsgoods.class);
	}
2
3
4
- create、update、delete方法前添加FlushCache注解
- @Transactional 事务回滚
- name="wsgoodsCache",一般与指定的缓存类名一致
- key=WsgoodsCache.LAST_FLUSH_KEY 指定key值
- dictKeys = "wsgoods" 指定业务字典code
- create
	@Override
	@Transactional(rollbackFor = Exception.class)
	@FlushCache(name="wsgoodsCache", keys=WsgoodsCache.LAST_FLUSH_KEY, dictKeys = "wsgoods")
	public Wsgoods createWsgoods(Wsgoods wsgoodsFromWeb) {
		wsgoodsFromWeb.setCreateTime(new Date());
		wsgoodsFromWeb = wsgoodsRepository.createWsgoods(wsgoodsFromWeb);
		return wsgoodsFromWeb;
	}
2
3
4
5
6
7
8
- update
	@Override
	@Transactional(rollbackFor = Exception.class)
	@FlushCache(name="wsgoodsCache", keys=WsgoodsCache.LAST_FLUSH_KEY, dictKeys = "wsgoods")
	public Wsgoods updateWsgoods(Wsgoods wsgoodsFromWeb) {
		Wsgoods wsgoods = wsgoodsRepository.getWsgoodsById(wsgoodsFromWeb.getId());
		ReflectionUtil.copyProperties(wsgoods, wsgoodsFromWeb);
		wsgoods.setLastUpdateTime(new Date());
		return wsgoodsRepository.updateWsgoods(wsgoods);
	}
2
3
4
5
6
7
8
9
- delete
	@Override
	@Transactional(rollbackFor = Exception.class)
	@FlushCache(name="wsgoodsCache", keys=WsgoodsCache.LAST_FLUSH_KEY, dictKeys = "wsgoods")
	public void deleteWsgoods(String[] ids) {
		wsgoodsRepository.deleteWsgoods(ids);
	}
2
3
4
5
6
# Scheduler定时任务
# 项目引入
- 在spring boot的启动类上配置@EnableScheduler("内置定时任务的basePackage") 例子:@EnableScheduler("com.gictgict.ims")
- 使用了@Scheduler注解内置定时任务时,@Scheduler的类需内在置定时任务的basePackage下
- 如果不使用@Scheduler,直接@EnableScheduler即可 例子:@EnableScheduler()
- pom.xml引入quartz jar
<!-- 定时任务 -->
	    <dependency>
		    <groupId>org.quartz-scheduler</groupId>
		    <artifactId>quartz</artifactId>
		    <version>2.3.2</version>
		</dependency>
2
3
4
5
6
# 使用说明
# 内置定时任务@Scheduler
- 在方法上使用@Scheduler注解,方法可在spring bean上,也可在普通的类上
- name是显示的名称,页面管理时会显示
- code非必填,通常不需要指定,只有需要通过code取得定时任务的对象时才指定
- cron是cron表达式
corn后可以以" "空格为间隔添加7个参数,从左至右依次表示:

秒:取值范围0-60
分:取值范围0-60
时:取值范围0-23
日:取值范围1-31
月:取值范围1-12
星期:取值范围1-7,同时也可以以星期的英文缩写,如周日sun
年:取值范围1970-2099,这个值可以省略不写。
除了直接用数字表示外,也可以使用通配符"*,?-/"

*:表示可以取任意值,如2 * * * * *,表示每分钟的第二秒执行任务
,:表示多个取值,如3,6,9 * * * * *,表示每分钟的第3秒,第6秒,第9秒都会执行任务。
?:只能使用在日期和星期上,表示值不确定,和*差不多。
-:表示时间范围,如0-30 * * * * *,表示每分钟的前30秒每秒执行一次。
/:表示时间段,一般是x/y格式,x表示起始时间,y表示步长,如0/2 * * * * *,表示从0开始,每两秒执行一次任务。
2
3
4
5
6
7
8
9
10
11
12
13
14
15
16
- fixedRate 定义每两次任务的间隔频率,从上一次任务开始执行开始计算,单位毫秒
- fixedDelay 定义任务下次开始执行的间隔时间,从上一次任务执行完成开始计算,单位毫秒
- corn,fixedRate,fixedDelay 必须是其中一个有值,其它两个为空
- 使用例子
public class TestJob {

	@Scheduler(name = "测试定时任务", fixedDelay = 2000)
	public void testJob1() {
		System.out.println("-----------testJob1---------");
		try {
			Thread.sleep(1000);
		} catch (InterruptedException e) {
			// TODO Auto-generated catch block
			e.printStackTrace();
		}
	}
}
2
3
4
5
6
7
8
9
10
11
12
13
# 页面新增的定时任务
- 使用页面增删改查,及管理
- code必须是唯一
- 支持两种执行器
1.spring bean + 方法:schedulerService.testExecute
2.普通类 + 方法:com.helpfulzoo.mtbase.modules.scheduler.test.TestJob.testJob1 - 执行器对应的方法,可以是没有参数,也可以带一个上下文参数(com.helpfulzoo.mtbase.modules.scheduler.job.JobExecutionContext),同一方法同时有这两个方法时,会调用带上下文参数的方法
# 打印组件
# 项目引入
- 后端pom.xml引入quartz jar
<!-- 打印模板用到 -->
		<dependency>
			<groupId>com.ibeetl</groupId>
			<artifactId>beetl</artifactId>
			<version>3.1.7.RELEASE</version>
		</dependency>
2
3
4
5
6
- 前端prototype.js文件
import {..., print} from '@mt/mtbase'
Vue.prototype.$print = print
2
- ueditor js 文件放到前端public/ueditor目录
# 使用说明
# 打印服务器配置
- 使用web远程打印,服务器端安装C-Lodop,开放8000或其它端口,客户端不需要安装插件
- 打印服务器新建一条记录,服务器地址指向安装C-Lodop的服务器的ip
# 打印功能配置
- 具体项目根据需求建立打印功能,每一条打印功能记录对应一个***后台扩展***
- 后台扩展是注册到spring的bean,bean id 为打印功能的code + "PrintBuilder"
- 后台扩展extends PrintBuilderSupport,initPropertiesConfig为初始化字段定义(在打印模板中可供使用的字段属性),initData是执行打印时的获取数据
- @DictCode 在model类(比如例子中的TestMain)中配置字典库
- @DateFormat("yyyy-MM-dd") 在model类(比如例子中的TestMain)中配置日期显示格式,默认显示yyyy-MM-dd HH:mm:ss
- 使用PrintJson才能让@DictCode和@DateFormat有效,看以下例子
- 后台扩展例子
@Component("testPrintBuilder")
public class TestPrintBuilder extends PrintBuilderSupport {

	@Autowired
	private IPrintService printService;

	@Override
	protected void initPropertiesConfig() {

		newPrintEntityByComment("testMain", "测试打印", TestMain.class);

		newPrintEntityByComment("testItem", "测试打印子项", TestItem.class).inList("testMain.testItems");

	}

	@Override
	public void initData(Map<String, Object> parametersMap) {
		String id = (String) parametersMap.get("id");
		PrintTemplate printTemplate = printService.getPrintTemplateById(id);
		TestMain testMain = new TestMain();
		ReflectionUtil.copyProperties(testMain, printTemplate);
		testMain.setContent("这是内容");
		List<TestItem> testItems = new ArrayList();
		testMain.setTestItems(testItems);
		for (int i = 0; i < 10; i++) {
			TestItem testItem = new TestItem();
			testItem.setCode("code" + i);
			testItem.setName("name" + i);
			testItems.add(testItem);
		}
		parametersMap.put("testMain", new PrintJson().copy(testMain).getResult());
	}

}
2
3
4
5
6
7
8
9
10
11
12
13
14
15
16
17
18
19
20
21
22
23
24
25
26
27
28
29
30
31
32
33
34
# 打印模板配置
- 一个打印功能可配置多个打印模板
- 循环表格在table标签上加class="for"
- 循环表格中有index变量,代表当前是第几行,从0开始
<table class="for">
# 打印配置
- 个人指定打印功能使用的打印模板,打印机等
# 前端打印
//直接打印
this.$print.print({printCode: "打印功能的code", id: "业务数据"})
//预览
this.$print.preview({printCode: "打印功能的code", id: "业务数据"})
2
3
4
- print及prview参数说明
- printCode 打印功能的code
- printTemplateCode 打印模板code
- printCode和printTemplateCode不能同时为空,也不能同时有值
- 具体业务用到的参数可直接加上,打印扩展initData可取到,比如例子中的id
# 数据库索引
- 在domain类的属性上加上@Index注解
- name 索引的名字,不设置默认为 table + '_ ' + column + '_idx'
- columns 联合索引 例子:"name,code"
/**
 * 演示功能
 * @author abc
 * @date 2020-01-10
 */
@Entity
@Table(name = "fpms_demo")
@Comment("演示功能")
public class Demo extends BaseDomain {

	...其它属性省略

	@Comment("操作人id")
	@Index
	private String operatorId;

	@Comment("名称")
	@Index(columns = "name,code")
	private String name;

	@Comment("电话")
	private String phone;


	...get set 方法省略

}
2
3
4
5
6
7
8
9
10
11
12
13
14
15
16
17
18
19
20
21
22
23
24
25
26
27
# 报表组件
# 前台调用导出
- exportReport第一个参数是code,code+"ReportBuilder"取得后台的ReportBuilder类
第二个参数为parametersFromWeb 传给后台的参数
this.$api.exportReport("test", {key1:"aaa"})
# 使用jxls2模板导出excel
- 后台新建一个ReportBuilder的类,继承JxlsReportBuilderSupport类
- 重写initData,设置数据
- getTemplate,设置模板地址
- 例子
@Component("testReportBuilder")
public class TestReportBuilder extends JxlsReportBuilderSupport {

	@Override
	public String initData(Map<String, Object> templateMap, Map<String, Object> parametersFromWeb) {
		templateMap.put("test", "测试字符");
		return null;
	}

	@Override
	protected String getTemplate() {
		return "excel/test.xlsx";
	}
}
2
3
4
5
6
7
8
9
10
11
12
13
14
- @Component("testReportBuilder"),其中code为test
- getTemplate返回模板(jxls2的模板)
http://jxls.sourceforge.net/ - initData设置模板参数,templateMap模板参数,parametersFromWeb页面传过来的参数
# 使用后台直接导出excel
- 后台新建一个ReportBuilder的类,继承ReportBuilderSupport类
- 设置内置模板,重写getTemplateType,默认为1,ReportBuilderSupport类的getTemplate如下
@Override
	protected String getTemplate() {
		String templateType = getTemplateType();
		if (StringUtil.isBlank(templateType)) {
			templateType = TEMPLATE_TYPE_1;
		}
		return "excel/template" + templateType + ".xlsx";
	}
2
3
4
5
6
7
8
- 重写 buildReport,构建Report对象
- 使用类和注解来定义列的例子
/**
 * 使用类来定义列
 *
 */
@Component("test2ReportBuilder")
public class Test2ReportBuilder extends ReportBuilderSupport {

	@Override
	protected void buildReport(Report report, Map<String, Object> parametersFromWeb) {
		List<TestReport> datas = getDatas(parametersFromWeb);
		report.addTable(new Table().setTitle("测试一下").build(TestReport.class).setDatas(datas));
	}

	private List<TestReport> getDatas(Map<String, Object> parametersFromWeb) {
		List<TestReport> testReports = new ArrayList();
		for (int i = 0; i < 100; i++) {
			TestReport testReport = new TestReport();
			testReport.setCode(RandomUtil.random(1, 100));
			testReport.setName("名称名称名称名" + i);
			testReport.setPhone("13500000001");
			testReports.add(testReport);
		}
		return testReports;
	}

	@Override
	protected String getName() {
		return "测试导出";
	}

	@Override
	protected String getTemplateType() {
		return null;
	}

	class TestReport implements Serializable {
		@ReportColumn(value = "代码", search = ReportColumn.SEARCH_INPUT)
		private Integer code;

		@ReportColumn(title = "名称", search = ReportColumn.SEARCH_INPUT)
		private String name;

		@ReportColumn(title = "手机", width = 50, wordWrap = true, search = ReportColumn.SEARCH_INPUT)
		private String phone;

		@ReportColumn(title = "序列号", search = ReportColumn.SEARCH_INPUT)
		private String number;

		@ReportColumn(title = "性别")
		@DictCode("sex")
		private String sex;

		@ReportColumn(title = "操作", width = 500, froze = ReportColumn.FROZE_RIGHT, type = ReportColumn.TYPE_BUTTON, template = "{'url':'111'}")
		private String opeartoin;

		---get set 方法省略了
	}
}
2
3
4
5
6
7
8
9
10
11
12
13
14
15
16
17
18
19
20
21
22
23
24
25
26
27
28
29
30
31
32
33
34
35
36
37
38
39
40
41
42
43
44
45
46
47
48
49
50
51
52
53
54
55
56
57
58
- 使用addTableColumn来定义列的例子
/**
 * 使用addTableColumn来定义列
 *
 */
@Component("test3ReportBuilder")
public class Test3ReportBuilder extends ReportBuilderSupport {

	@Override
	protected void buildReport(Report report, Map<String, Object> parametersFromWeb) {
		List<Map> datas = getDatas(parametersFromWeb);
		report.addTable(new Table()
				.setTitle("测试一下")
				.addTableColumn("code", "代码")
				.addTableColumn("name", "名称")
				.addTableColumn(new TableColumn("phone", "手机").setStyleType(Integer.class.getName()))
				.addTableColumn("operation", "操作")
				.addTableColumn(new TableColumn("sex", "性别").setWidth(50).setDictCode("sex"))
				.setDatas(datas));
	}

	private List<Map> getDatas(Map<String, Object> parametersFromWeb) {
		List<Map> testReports = new ArrayList();
		for (int i = 0; i < 100; i++) {
			Map testReport = new HashMap();
			testReport.put("code", RandomUtil.random(1, 100));
			testReport.put("name", "名称名称名称名" + i);
			testReport.put("phone", "13500000001");
			testReports.add(testReport);
		}
		return testReports;
	}

	@Override
	protected String getName() {
		return "测试导出";
	}

	@Override
	protected String getTemplateType() {
		return null;
	}

}
2
3
4
5
6
7
8
9
10
11
12
13
14
15
16
17
18
19
20
21
22
23
24
25
26
27
28
29
30
31
32
33
34
35
36
37
38
39
40
41
42
43
# 待办
# 使用说明
- 创建待办信息 TodoUtil.addTodo
createTodo(String moduleCode, String operationCode, String objectId, String title, String content)

createTodo(String moduleCode, String operationCode, String objectId, String title, String content, String personId)
2
3
# 金融类金额浮点数处理
- java类型使用BigDecimal
- domain的注解默认是precision = 19, scale = 2
@Comment("金额")
private BigDecimal amount;//precision = 19, scale = 2

@Comment("价格")
@Column(precision = 19, scale = 6)
private BigDecimal price;
2
3
4
5
6
银行等金融类的金额一般使用4位小数,使用银行家舍入法
普通公司的金额可使用默认的两位小数
普通公司的价格可根据具体需求,使用4位,2位,6位精度构建BigDecimal一定要用String参数,不能用float等参数
BigDecimal newPrice = new BigDecimal("88.88");//正确的方式
BigDecimal newPrice = new BigDecimal(88.88);//错误的方式
2
- 比较使用BigDecimal的compareTo
BigDecimal newPrice = ...
BigDecimal oldPrice = ...
if (newPrice.compareTo(oldPrice) > 0) {

}
2
3
4
5
- 运算可以直接用BigDecimal的方法,也可以使用MathUtil相关运算方法
- 存进数据库前,使用MathUtil.format或*AndFormat方法进行精度处理
- 前台js
this.$util.add(数字1, 数字2, 精度(默认两位))等运算方法运算及format精度
this.$util.round(数字, 精度(默认两位))
# 前端开发流程
# mt-input组件
- params 用来传给回调的自定义参数
- @keyup keyup回调 参数:value,params,name
- @input input回调 参数:value,params,name
- @change change回调 参数:value,params,name
@change="changePrice" :params="model"

changePrice(value, params, name) {

}
2
3
4
5
# ListTable组件
<mt-list-table :url="this.$mtsampleAdmin + '/dict/list'" ref="demoList" pageSize=10 v-slot="model">
        <mt-column property="name" name="名称" width="100">
            <a href="javascript:void(0);" @click="show" :value="model.id">{{model.name}}</a>
        </mt-column>
        <mt-column property="code" name="代码" width="100"/>
        <mt-column property="createTime" name="创建时间">
            {{$date.formatDateTime(model.createTime)}}
        </mt-column>
        <mt-column property="operation" name="操作" width="100">

        </mt-column>
    </mt-list-table>
2
3
4
5
6
7
8
9
10
11
12
# mt-list-table
- url为远程调用的地址,为空时使用listData来设置数据
- ref为别名,刷新数据这例子调用demoList.list()
- pageSize 每页的记录数
- @select checkbox选中后回调的函数,参数:checked,selectRowData
- height 高度,默认为full自动撑满,auto表示不撑满
- v-slot 变量名
- listData 指定列表数据,url为空才生效,数据结构支持以下两种:
- 数组 []
[{id: '', code: '', {id: '', code: ''}}]1- 对象
{list:[{id: '', code: '', {id: '', code: ''}}], page: {index: 1, size: 10, total: 100}}1 - holdScroll 刷新表格后是否保持滚动条,默认为false
- inDialog 在弹出的窗口设为true会自动计算高度
- showPage 是否显示分页,默认为true,当返回的数据没有page时,也不显示分页
- addRowButton 新增一行的函数,不为空时会显示序号,同时在序号的标题列显示+号按钮,函数返回行的对象{}时,会新增一行,返回false时不新增
- total 是否后台带到前到的合计行,当为true时,请求返回以下列表数据会显示合计行
ajax返回的列表数据
{
	success: true,
	message: "查询成功",
	list: [{id:"", name: "", price:11}...],
	page: {index: 1, size: 20, total: 100},
	totalRows: [{name: "所有合计", price: 999}]
}
totalRows是数据或对象,数组表示多行
2
3
4
5
6
7
8
9
直接新增一行
:addRowButton=true
-------
函数的方式新增一行
:addRowButton="onAddRow"

js-----
onAddRow () {
	return {id: "", xx: "xxx"}
}
2
3
4
5
6
7
8
9
10
# mt-list-table方法
//假设ref别名demoList,调用方法例子:
this.$refs.demoList.addRow
2
- addRow(model) 增加一行
- removeRow(value, key="id") 删除一行,key代表value是什么值,默认为id值
- list 刷新数据
- getListData() 取得数据
- getSelectedId() 取得选中的id
- getSelected() 取得选中的model对象
- markSelected(selectedIds) 选中
- markSelectedData(listData) 选中
- resize() 重绘尺寸
- showLoading() 显示loading
- hideLoading() 隐藏loading
# mt-column
- total 显示总计,字符类型的直接显示,true为组件自动合计本页这列数据
<mt-column property="number" name="序号" total="本页合计"/>
<mt-column property="amount" name="金额" :total=true/>
2
- wordWrap 自动换行,默认为false
注意:如果内嵌的是select,input等组件,wordWrap要设为true,否则select的下位内容会被遮住,且显示的位置不在正中 - expand 表示当前列为展开的列,里面的内容为展开的内容
- @load 是点击展开按钮,异步加载展开内容触发的方法,在这方法里有三个参数model, successCallback, errorCallback,model是当前行的数据
<mt-column expand @load="loadTable">
	<div style="width:100%;padding:10px;background:#FFFFFF">
		<mt-list-table :id="'table_'+model.id" :listData="model.items" pageSize=10 height="auto">
			<mt-column property="config" name="配置"></mt-column>
			<mt-column property="status" title="启用状态" width="110" :wordWrap=true>
                    <mt-select v-model="model.status" dictCode="status"/>
                </mt-column>
		</mt-column>
		</mt-list-table>
	</div>
</mt-column>
----------------js分割线-------------
methods: {
    loadTable(model, successCallback, errorCallback) {
        this.$ajax.post(this.$mtsampleAdmin + '/demo/list', {}).then((result) => {
            if (result.success) {
                model.items = result.list
                successCallback(model)
            } else {
                errorCallback()
            }
        })
    },
}
2
3
4
5
6
7
8
9
10
11
12
13
14
15
16
17
18
19
20
21
22
23
24
# 列表Table合计功能
- 有两种合计:本页合计和所有合计
# 前端可实现本页合计
- mt-column 配置 total属性
- total=文本表示直接显示内容
- total="true"表示会把这列的值合计后显示
<mt-column property="customerName" title="客户名称" width="250" total="本页合计"/>
<mt-column property="orderAmount" title="下单金额" width="110" total="true" />
2
# 后端可实现本页合计和所有合计
- mt-list-table 要设置total="true"
- 用Query对象来实现自动统计功能
query.pageTotal(true);//启用本页统计
//query.allTotal(true); //启用所有统计(默认启用,所以不用调用)
query.totalValue("number", "所有合计", "本页合计");//手工指定合计列显示的内容,第二个参数是给所有合计行用的,第三个参数是给本页合计用的
query.total("sum(order_amount)");//指定需要系统自动计算合计的列
return orderRepository.listOrderForPage(query.order("createTime", Query.ORDER_DESC));
2
3
4
5
- 手工设置合计,设置好返回前台的totalRows
ajax返回的列表数据
{
	success: true,
	message: "查询成功",
	list: [{id:"", name: "", price:11}...],
	page: {index: 1, size: 20, total: 100},
	totalRows: [{name: "所有合计", price: 999}]
}
totalRows是数据或对象,数组表示多行
2
3
4
5
6
7
8
9
10
# list-table左侧小箭头下拉可展开行数据关联子项信息
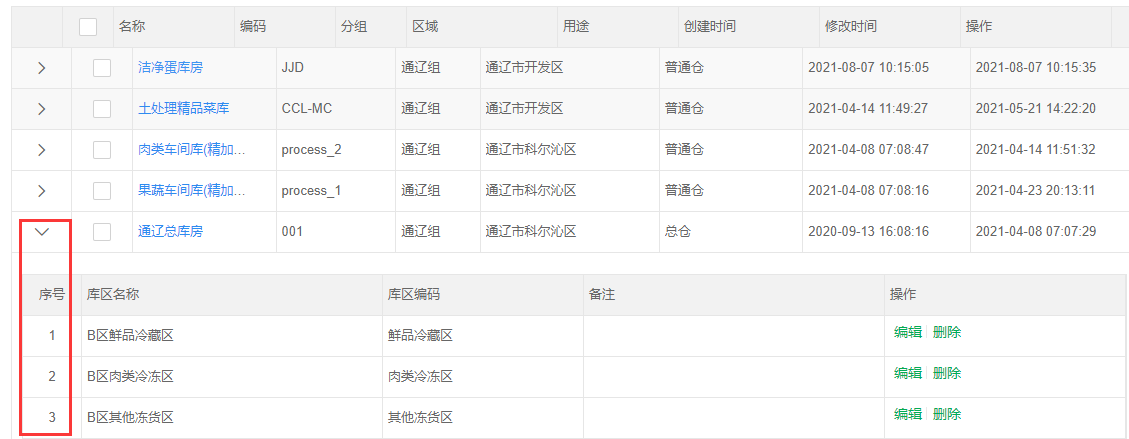
<mt-list-table :url="this.$mtsampleAdmin + '/inventory/storage/list'" ref="storageList" pageSize="20" v-slot="model">
        <mt-column expand @load="listStoreArea" :currentModel="model">
                <div style="width:100%;padding:10px;background:#FFFFFF">
                        <mt-list-table :id="'table_'+model.id" :listData="model.items" v-slot="item" pageSize=10 height="auto" :showSelect=false :showIndex=true>
                        <mt-column property="goodsId" title="库区名称" width="300">
                        <mt-tooltip :content="item.name" :transfer=true theme="light">
                                {{item.name}}
                        </mt-tooltip>
                        </mt-column>
                        <mt-column property="code" title="库区编码" width="200">
                                {{item.code}}
                        </mt-column>
                        <mt-column property="memo" title="备注" width="300" />
                        <mt-column property="operation" title="操作" width="240" frozen="right">
                        <mt-button-group divideLine=true>
                                <mt-button id="initButton3" @click="showArea" :rowdata="item" permission="storage.save" :value="item.id" type="none">编辑</mt-button>
                                <mt-button id="initButton4" @click="deleteArea" :rowdata="item" permission="storage.delete" :value="item.id" type="none">删除</mt-button>
                        </mt-button-group>
                        </mt-column>
                         </mt-list-table>
                </div>
        </mt-column>

		<mt-column property="name" title="名称" width="120">
                <a href="javascript:void(0);" @click="show" :value="model.id">{{model.name}}</a>
        </mt-column>
        <mt-column property="code" title="编码" width="100" />
        <mt-column property="parentId" title="分组" width="70" dictCode="storagegroup" :value="model.parentId" />
        <mt-column property="transitareaId" title="区域" width="150" dictCode="transitarea" :value="model.transitareaId" />
        <mt-column property="purpose" title="用途" width="120" dictCode="storage.purpose" :value="model.purpose" />
        <mt-column property="createTime" title="创建时间" width="140">
            	{{$date.formatDateTime(model.createTime)}}
        </mt-column>
        <mt-column property="lastUpdateTime" title="修改时间" width="140">
                {{$date.formatDateTime(model.lastUpdateTime)}}
        </mt-column>
        <mt-column property="operation" title="操作" width="150" frozen="right">
                <mt-button-group divideLine=true>
                        <mt-button id="initButton1" @click="initArea" :rowdata="model" permission="storage.initArea" :value="model.id" type="none">新增库区</mt-button>
                        <mt-button id="initButton2" @click="editLocation" :rowdata="model" permission="storage.editLocation" :value="model.id" type="none">编辑库位</mt-button>
                </mt-button-group>
        </mt-column>
</mt-list-table>
2
3
4
5
6
7
8
9
10
11
12
13
14
15
16
17
18
19
20
21
22
23
24
25
26
27
28
29
30
31
32
33
34
35
36
37
38
39
40
41
42
43
- 列表行数据展开,数据内容显示
listStoreArea(model, successCallback, errorCallback) {
            this.$ajax.post(this.$mtsampleAdmin + '/inventory/storeArea/list', { storageId: model.id }).then((result) => {
                if (result.success) {
                    model.items = result.list
                    successCallback(model)
                } else {
                    errorCallback()
                }
            })
        },
2
3
4
5
6
7
8
9
10
# dict字典库组件
- cache 缓存配置,默认开启
- params 字典参数,对象 比如 :params={string1: value},service的map可以取得string1的值
- 后台字典库更新缓存
DictCache.removeDictCache("字典代码1","字典代码2","字典代码3");
# show页面字典库使用
select下拉框数据源配置
- dictCode="prissue.superficialType",dictCode指定后台关联的字典库
<mt-show-table-item label="面上问题类别">
        <mt-select v-model="prissue.superficialType" placeholder="面上问题类别" dictCode="prissue.superficialType" :validate="{required:false, maxlength:255}" search/>
</mt-show-table-item>
2
3
# list页面字典库使用
listtable中的列需要显示show页面select框关联的字典项数据
- 方法一:
<mt-column property="superficialType" title="面上问题类别" width="110" dictCode="prissue.superficialType" :value="model.superficialType"/>
- 方法二:
<mt-column property="superficialType" title="面上问题类别" width="110">
<mt-key-to-value :value="model.superficialType" dictCode="prissue.superficialType" />
</mt-column>
2
3
# Select组件
mt-select
- dictCode 字典代码,数据来源于字典库
- dictData, 格式为[{key: '1', value: '启用'}, {key: '0', value: '禁用'}]
<mt-radio v-model="menu.enableStatus"
                :dictData="[{key: '1', value: '启用'}, {key: '0', value: '禁用'}]"
                 style="width:200px;" default="1" />
2
3
- 搜索 search,如果希望是远程搜索,则加上remote,可通过配置delay指定延时搜索的毫秒数(remote下才生效)
<mt-select search remote delay=500 v-model="demo.config" placeholder="配置" dictCode="demo.config" width="200" :validate="{required: true}">
                            </mt-select>
2
- tabindex 配置tabindex值,默认为0
- nextFocusId 选中值后,下一个获得焦点的元素的id
<mt-select v-model="demo.config" placeholder="配置" dictCode="demo.config" nextFocusId="memo"/>
...
<mt-input v-model="demo.memo" placeholder="备注" id="memo"/>
2
3
- template 自定义显示模板
<mt-select v-model="demo.config" placeholder="配置" dictCode="demo.config" :template="template"/>
methods: {
	template(item) {
		return item.name  + '<span style="position: absolute; right: 10px; color: #8799a3">'+item.id+'</span>'
	}
}
2
3
4
5
# mt-step 组件
- 添加流程指引相关信息
- description:标签信息描述
- value:参数值
<mt-step v-model="stepValue">
        <mt-step-form title="创建人才库" description="添加人才库信息" value="00"></mt-step-form>
        <mt-step-form title="绑定工作组" description="人才关联工作组" value="0"></mt-step-form>
        <mt-step-form title="上传附件" description="人员信息相关附件" value="1"></mt-step-form>
</mt-step>
2
3
4
5
- 数据定义
data() {
        return {
            stepValue: '00'
        };
    },
2
3
4
5
- 赋值
show(id) {
            this.pruserdemo = { id: id };
            this.stepValue = '00'
            if (id) {
                this.$ajax
                    .post(this.$mtsampleAdmin + "/pruserdemo/get", { id: id })
                    .then(result => {
                        if (result.success) {
                            this.pruserdemo = result.pruserdemo;
                            this.pruserdemo.password = "********"
                        } else {
                            this.$message.error(result.message, 3);
                        }
                    });
            }
            this.$parent.show();
        },
2
3
4
5
6
7
8
9
10
11
12
13
14
15
16
17
# 页面基础样式调整与基础组件应用
# list页面
# 添加标签
<mt-tab>
<mt-tab-button-item>
</mt-tab-button-item>
<mt-tab-item title=""></mt-tab-item title="">
</mt-tab>
2
3
4
5
# 添加操作栏
<mt-column property="operation" title="操作" width="140" frozen="right">
     <mt-button-group divideLine=true>
        <mt-button id="initButton1" @click="edit" :rowdata="model" :value="model.id" type="none" permission="prissue.save">编辑</mt-button>
        <mt-button id="initButton3" @click="_delete" :rowdata="model" type="none" permission="prissue.delete">删除</mt-button>
    </mt-button-group>
</mt-column>
2
3
4
5
6
# 添加搜索栏
- input搜索 operate 为"="或者"li",li表示sql的like关键字
<mt-search-item v-model="searchMap.name" label="名称" placeholder="请输入名称" type="text" operate="li"></mt-search-item>
- 日期搜索
<mt-search-item v-model="searchMap.deliveryDate" label="发货日期" placeholder="请输入发货日期" type="date" operate="betweenTime" ></mt-search-item>
- 日期范围搜索
<mt-search-item v-model="searchMap.schoolDate" label="上课日期" placeholder="请输入上课日期" type="daterange" operate="betweenTime"></mt-search-item>
- 下拉关联字典项搜索
<mt-search-item v-model="searchMap.reportType" label="报告类型" headerLabel="全部" dictCode="qcreport.reportType" operate="=" type="select" />
- 下拉关联字典项可输入搜索
<mt-search-item v-model="searchMap.prgroupdemoId" label="工作组" headerLabel="全部" placeholder="请选择工作组" type="select" operate="=" dictCode="prgroupdemo.search" search remote></mt-search-item>
字典项prgroupdemo.search接口示例:
@Override
	public List<Prgroupdemo> listPrgroupdemoForSearchMap(Map paramMap) {
		Query query = new Query();
		String name = (String)paramMap.get("keyword");
		if (StringUtil.isNotBlank(name)) {
			query.likeEmpty("name", name);
		}
		return prgroupdemoRepository.list(query);
	}
2
3
4
5
6
7
8
9
- 搜索框较多可隐藏
- 添加advanced
<mt-search-item v-model="searchMap.status" label="启用状态" placeholder="请输入启用状态" type="select" operate="=" dictCode="common.enableStatus" advanced></mt-search-item>
- 分类树搜索
<mt-search-item type="select" label="商品分类" v-model="searchMap.goodstypeId" placeholder="商品分类" operate="=" dictCode="goodstype" remote :tree="{idField: 'key', parentIdField: 'parentKey', checkbox: false}" headerLabel="全部分类"/>
# 添加show页面title
- 引入show时可在mt-show标签上自定义宽度、高度、title
<mt-show width="900" height="850" :title="showTitle">
    <prissue-show ref="prissueShow" @list="list" />
</mt-show>
2
3
- 数据定义
data() {
        return {
            showTitle: ""
        };
    }
2
3
4
5
- 新增、编辑弹开页面时可指定标题
init() {
            this.showTitle = "新增问题"
            setTimeout(() => {
                this.$refs.prissueShow.show();
            }, 10)
        },
"edit"(row, id) {
            this.showTitle = "编辑问题"
            setTimeout(() => {
                this.$refs.prissueShow.show(row.id);
            }, 10)
        },
2
3
4
5
6
7
8
9
10
11
12
13
# 自定义宽度、高度,在mt-show标签上指定
- 引入show时可在mt-show标签上自定义宽度、高度、title
- 自适应宽度、高度
- 建议自定义指定宽度和高度,如下面例子所示:
<mt-show width="900" height="850">
    <prissue-show ref="prissueShow" @list="list" />
</mt-show>
2
3
# show页面基础组件应用
- input框
<mt-show-table-item label="名称">
    <mt-input v-model="prissue.name" placeholder="名称" :validate="{required:true, maxlength:255}"/>
</mt-show-table-item>
2
3
- input框(密码)
<mt-show-table-item label="密码">
    <mt-input v-model="pruser.password" type="password" placeholder="名称" :validate="{required:true, maxlength:255}"/>
</mt-show-table-item>
2
3
- select框
<mt-show-table-item label="巡察对象">
    <mt-select v-model="prissue.prunitId" placeholder="巡察对象id" dictCode="prunit.search"/>
</mt-show-table-item>
2
3
- select多选框
多选:multi=true
<mt-show-table-item label="巡察对象">
    <mt-select v-model="prissue.prunitId" placeholder="巡察对象id" dictCode="prunit.search" :multi=true/>
</mt-show-table-item>
2
3
- 单选按钮
<mt-show-table-item label="巡察对象">
    <mt-radio v-model="prissue.auditStatus" placeholder="审核状态" dictCode="prissue.auditStatus" :validate="{required:false, maxlength:255}" search/>
</mt-show-table-item>
2
3
- checkbox
<mt-show-table-item label="生产线信息">
        <mt-checkbox dictCode="prunit.search"  v-model="prissue.prunitId" :validate="{required: true}" ></mt-checkbox>
</mt-show-table-item>
2
3
- 文本编辑区
- 需要占两行在标签上设置colspan="2"
- 设置宽度高度:styles=" "
- 必填项:required:true
<mt-show-table-item label="审核意见" colspan="2">
     <mt-textarea v-model="prissue.auditOpinion" styles="width:100%;height:100px;" :validate="{required:false, maxlength:2000}"/>
</mt-show-table-item>
2
3
- 时间选择
<mt-show-table-item label="开始时间">
    <mt-date-picker v-model="prplan.startTime" placeholder="开始时间" type="date" styles="width:400px" :validate="{required:false, maxlength:255}" />
</mt-show-table-item>
2
3
- 日期选择
<mt-show-table-item label="日期">
    <mt-date-picker v-model="prplan.date " placeholder="日期" type="date" :validate="{required:true, date:true}" />
</mt-show-table-item>
2
3
# 添加tab页
# list页面添加tab页
- 添加tab标签
<template>
    <mt-listContent>
        <mt-tab>
            <mt-tab-button-item>
                <mt-button id="initButton" icon="add" @click="batchHandle" v-if="batchBtn">批量处理</mt-button>
            </mt-tab-button-item>
            <mt-tab-item title="全部" @click="showTab()"></mt-tab-item>
            <mt-tab-item title="未确认" @click="showTab('0')"></mt-tab-item>
            <mt-tab-item title="已确认" @click="showTab('1')"></mt-tab-item>
            <mt-tab-content>
                <mt-search-table @search="list" columns="3">
                    <mt-search-item v-model="searchMap.itcurriculumName" label="课程名称" placeholder="请输入课程名称" type="text" operate="li"></mt-search-item>
                </mt-search-table>
                <mt-list-table
                    :url="this.$mtsampleAdmin + '/itwarningevent/list'"
                    ref="itwarningeventList"
                    pageSize="20"
                    v-slot="model">
                <mt-column property="itclassName" title="班级" width="110"/>
                </mt-list-table>
            </mt-tab-content>
        </mt-tab>
    </mt-listContent>
</template>
2
3
4
5
6
7
8
9
10
11
12
13
14
15
16
17
18
19
20
21
22
23
24
- 点击事件
showTab(status) {
       if (status) {
                this.searchMap.status = '=_' + status
            } else {
                this.searchMap.status = ''
            }
            this.list()
  }
2
3
4
5
6
7
8
# show页面添加tab页
- 添加tab标签
<template>
<mt-show-content title="巡察计划">
    <mt-tab>
        <mt-tab-button-item style="margin-top: 750px; margin-right: -10px">
            <mt-button id="saveButton" icon="save" type="primary" @click="save">保存</mt-button>
            <mt-button id="saveButton1" icon="save" type="primary" @click="_submit">审核</mt-button>
            <mt-button id="closeButton" icon="close" @click="this.$parent.close" type="normal">关闭</mt-button>
        </mt-tab-button-item>
        <mt-tab-item title="基本信息" @click="showTab('1')">
            <mt-card title="基本信息">
                <mt-show-table ref="showTable" columns="2">
                    <mt-show-table-item label="名称">
                        <mt-input v-model="prplan.name" placeholder="名称" :validate="{required:true, maxlength:255}" />
                    </mt-show-table-item>
                </mt-show-table>
            </mt-card>
        </mt-tab-item>
        <mt-tab-item title="工作资料" @click="showTab('2')">
            <mt-card title="工作资料上传">
                <file-list ref="fileList" moduleCode="prplan" :objectId="prplan.id" :permission="{delete: true, upload: true}" />
            </mt-card>
        </mt-tab-item>
    </mt-tab>
</mt-show-content>
</template>
2
3
4
5
6
7
8
9
10
11
12
13
14
15
16
17
18
19
20
21
22
23
24
25
- 数据定义
data() {
        return {
            tabStatus:''
        };
    },
2
3
4
5
- 点击事件
showTab(tabStatus) {
            this.tabStatus = tabStatus
        },
2
3
# 富文本 editor
# 项目引入
- ueditor js 文件放到前端public/ueditor目录
# 使用说明
- editor标签
<editor :config="{}" v-model="xxx.content" ref="editor" />
- config配置,参考:http://fex.baidu.com/ueditor/#start-config
- 在光标处插入内容
insertContent() {
	var target = event.target || event.srcElement
	let content = target.innerHTML
	this.$refs.editor.insertContent(content)
},
2
3
4
5
# 附件上传 FileUpload
# 项目引入
- pom.xml引入jar
<!-- 文件服务器 -->
<dependency>
			<groupId>com.helpfulzoo</groupId>
			<artifactId>fileserver</artifactId>
			<version>1.0.0-SNAPSHOT</version>
		</dependency>
2
3
4
5
6
- *Application中加@EnableFileServer注解
# 使用说明
# 后端配置文件conf/fileserver.properties
default.provider=local
default.bucket=test
default.accessKey=
default.secretKey=
default.pathPrefix=d:/filesystem/ims/
default.urlPrefix=http://127.0.0.1:8082/images/
default.endpoint=
default.allowExtension=doc,docx,xls,xlsx,jpg,jpeg,png,gif,pdf,txt,md
2
3
4
5
6
7
8
- default前缀 表示默认的配置
- provider 具体的实现,local是本地文件,aliyun是阿里云,qcloud云
- bucket 对应provider的bucket
- accessKey 对应provider的accessKey
- secretKey 对应provider的secretKey
- endpoint 对应provider的endpoint
- pathPrefix 后台访问文件的根目录,本地目录是绝对路径,阿里云等是相对路径
- urlPrefix 给前端访问文件的url根路径
- allowExtension 默认支持的文件类型
- 取得urlPrefix:FileOperator.get().getUrlPrefixEndNoSeparator()
# 前端页面file-list标签
<mt-card title="相关文件">
        <file-list ref="fileList" moduleCode="batch" :objectId="batch.id" :permission="{delete: true, upload: true}"/>
</mt-card>
2
3
- moduleCode 功能代码,区分各功能,必填
- objectId 业务表单id,必填
- permission 权限,默认为{delete: true, upload: true}
- type 分类
- filter 过滤条件1
- filter2 过滤条件2
- filter3 过滤条件3
- compressImageSize 图片大于这个大小就压缩,默认为1024 * 1024 (1M)
- maxImageWidth 图片最大的宽度,大于这个宽度的图片会被缩小到这个宽度,默认为5000
- imageQuality 图片压缩的比例,默认为0.8
- tempSave 是否临时保存,默认是true,当为true时,上传完成的文件是待保存状态,需要点保存按钮才把状态更新为可用状态(使用说明看下面的'前端页面保存业务功能方法'),false时一上传就直接是可用状态了,不用点保存按钮
- showList 是否显示文件列表,默认为true
- height 上传框的高度,int类型
- @success 上传成功的回调,参数(fileIds, files)fileIds为上传成功的fileIds,files为上传成功的files
- isImage 是否图片列表,默认为false
- deleteUrl 自定义删除url,后台的方法如下
---Controller
@PostMapping("/deleteImage")
    @ResponseBody
    public String deleteImage(@RequestBody String[] fileIds) {
        magoodsService.deleteMagoodsImageByImageIds(fileIds);
        return this.newJson().setSuccessMessage("操作成功").toJsonString();
    }
---Service
@Override
	@Transactional(rollbackFor = Exception.class)
	public void deleteMagoodsImageByImageIds(String[] imageIds) {
		magoodsRepository.deleteMagoodsImageByImageIds(imageIds);
		fileService.deleteFile(imageIds).subscribe();//TODO:事务?
	}
2
3
4
5
6
7
8
9
10
11
12
13
14
this.$refs.fileList.方法名
- getToSaveFileIds 取得上传了,但未保存的fileId
- resetToSaveFileIds 重置待保存的fileId
- 注意:业务show页面时,要把业务id置空,让fileList监听到有变化
show(id) {
	//id设为"",进来让fileList刷新
	this.magoodsSpu = { id: ""};
	if (id) {
		...业务逻辑
	} else {
		this.listGoodsData = []
	}
	this.$parent.show()
},
2
3
4
5
6
7
8
9
10
# 图片上传
- list-table列表 显示图片
<mt-column property="imagePath" title="商品图片" width="80">
        <img :src="$fileUrlPrefix+model.imagePath" width="30px" height="30px"/>
</mt-column>
2
3
- show页面添加图片
<mt-card title="图片上传">
        <mt-show-table ref="showDetail" columns="1">
                <mt-show-table-item label="" v-if="$util.hasPermission('prgroupsample','save')">
                    <file-list ref="fileList" :tempSave=true  :isImage=true  moduleCode="prgroupsample" :compressImageSize=1 :maxImageWidth=1000 @success="uploadImage" :objectId="prgroupsample.id"  :permission="{delete: true, upload: true}" />
                </mt-show-table-item>
        </mt-show-table>
</mt-card>
2
3
4
5
6
7
当tempSave为true时才需要使用
在save方法的this.$ajax.post之前调用
this.$refs.fileList.addFileIds(this.业务model)
- 后端需要保存图片路径:
create和update时保存图片路径:
this.putImagePath(prgroupsample);
domain添加字段
@Comment("图片id")
private String fileId;
@Comment("图片path")
private String imagePath;
//省略getter、setter方法
2
3
4
5
自动装配fileService
@Autowired
private IFileService fileService;
2
private void putImagePath(Prgroupsample vo) {
		if (StringUtil.isNotBlank(vo.getFileId())) {
			File file = fileService.getFileById(vo.getFileId()).block();
			if (file != null) {
				vo.setImagePath(file.getDistPath()+file.getDistFileName());
			}

		} else {
			vo.setImagePath(null);
		}
	}
2
3
4
5
6
7
8
9
10
11
# 前端页面保存业务功能方法
- 当tempSave为true时才需要使用
- 在save方法的ajax.post之前调用this.$refs.fileList.addFileIds(this.业务model),如有多个不同的fileList可分别调用
- 图片显示要配置 Vue.prototype.$fileUrlPrefix
initConfig() {
	return this.$ajax.post(this.$mtsampleAdmin + '/ma/initConfig', {}).then(result => {
		if (result.success) {
			Vue.prototype.$fileUrlPrefix = result.fileUrlPrefix
		} else {
			this.$message.toast(result.message)
		}
	})
},
2
3
4
5
6
7
8
9
---javascript
save() {
            if (this.$refs.showTable.validate()) {
                let type = "";
                if (!this.batch.id || this.batch.id === "") {
                    type = "create";
                } else {
                    type = "update";
                }
				this.$refs.fileList.addFileIds(this.batch)
                this.$ajax.post(
                        this.$mtsampleAdmin + "/inventory/batch/" + type,
						this.batch
                    ).then(result => {
                        if (result.success) {
                            this.batch = result.batch;
                            this.$message.toast(result.message);
                            if (this.close && this.$parent.close) {
                                this.list();
                                this.$parent.close();
                            }
                        } else {
                            this.$message.error(result.message);
                        }
                    });
            }
        }
---javascript
2
3
4
5
6
7
8
9
10
11
12
13
14
15
16
17
18
19
20
21
22
23
24
25
26
27
28
# 权限判断
# 前端权限判断
- 以下例子moduleCode为demo,operationCode为delete
- 公用组件上权限参数为permission,支持permission的公用组件:Button,Card,ListColumn,SearchItem,ShowTableItem,比如以下的mt-button例子
//js
if (this.$util.hasPermission("demo", "delete")) {

}
或
if (this.$util.hasPermission("demo.delete")) {

}
//template
v-if = "util.hasPermission('demo', 'delete')"
或
v-if = "util.hasPermission('demo.delete')"
//button
<mt-button @click="_delete" permission="demo.delete">删除</mt-button>
//column
<mt-column property="config" name="配置" permission="demo.delete"></mt-column>
2
3
4
5
6
7
8
9
10
11
12
13
14
15
16
# 后端权限判断
//非响应式
if (PermissionUtil.hasPermission(demo, delete)) {

}

//响应式
//暂未实现
2
3
4
5
6
7
# 节流与防抖
- Button组件内置了节流处理,默认2000毫秒,如需修改节流时间,可配置Button组件的interval参数,单位为毫秒
- SearchTable组件内置了节流处理,search事件触发间隔为500毫秒
- 节流
/**
 * 节流原理:在一定时间内,只能触发一次
 *
 * @param callback 要执行的回调函数
 * @param interval 间隔时间
 * @param id 同一id使用同一个节流器,默认为default
 * @param immediate 是否立即执行,默认true
 * @return null
 */
throttle(callback, interval = 500, id, immediate)
2
3
4
5
6
7
8
9
10
使用例子:
this.$util.throttle(() => {
	console.log("执行了")
}, 2000, "区别不同方法的id")
2
3
- 防抖
 /* 防抖原理:一定时间内,只有最后一次操作,再过delay毫秒后才执行函数
 *
 * @param callback 要执行的回调函数
 * @param delay 延时的时间
 * @param id 同一id使用同一个节流器,默认为default
 * @param immediate 是否立即执行,默认为true
 * @return null
 */
debounce(callback, delay = 500, id, immediate)
2
3
4
5
6
7
8
9
使用例子:
this.$util.debounce(() => {
	console.log("执行了")
}, 2000, "区别不同方法的id")
2
3
# 微信公众号
# 实现思路
- 方案一:使用过滤器,每个请求进来进行自动登录
缺点:组件实现复杂,登录后的token不能变(不变可能有安全问题),否则导致并发请求多次登录
优点:使用时简单,不用关注微信登录逻辑 - 方案二:vue的App.vue里,有个初始化的ajax来自动登录,登录完成后才进行其它的请求
缺点: 必须要等待自动登录的ajax返回才可以进行其他请求,需要做额外的等待控制,且等待时间长,体验不好 优点:组件后台和前台逻辑简单 - 使用方案一
# 后端引入说明
- pom.xml加上
<!-- 微信公众号 -->
<dependency>
	<groupId>com.helpfulzoo</groupId>
	<artifactId>weixin</artifactId>
	<version>1.0.0-SNAPSHOT</version>
</dependency>
2
3
4
5
6
- 加一个filter来拦截处理微信的信息(这filter必须在LoginFiler的前面执行)
import org.springframework.beans.factory.annotation.Autowired;
import org.springframework.core.Ordered;
import org.springframework.core.annotation.Order;
import org.springframework.stereotype.Component;

import com.freeworld.json.Json;
import com.gict.imall.modules.mauser.service.IMauserService;
import com.gict.imall.util.FrontLoginUtil;
import com.gict.imall.util.FrontLoginVO;
import com.helpfulzoo.weixin.dto.WeiXinUser;
import com.helpfulzoo.weixin.filter.WeiXinLoginFilterSupport;

@Component
@Order(Ordered.HIGHEST_PRECEDENCE + 1)
public class WeixinLoginFilter extends WeiXinLoginFilterSupport {

	@Autowired
	private IMauserService mauserService;

	@Override
	protected boolean isWxSystem() {
		return true;
	}

	@Override
	protected Object getCurrUserId() {
		String userId = null;
		FrontLoginVO loginVO = FrontLoginUtil.getFrontLoginVO();
		if (loginVO != null) {
			userId = loginVO.getUserId();
		}
		return userId;
	}

	@Override
	protected Json login(WeiXinUser weiXinUser) {
		return mauserService.login(weiXinUser);
	}

	@Override
	protected Json getLoginJson() {
		FrontLoginVO loginVO = FrontLoginUtil.getFrontLoginVO();
		if (loginVO != null) {
			return loginVO.toJson();
		} else {
			return null;
		}
	}

}
2
3
4
5
6
7
8
9
10
11
12
13
14
15
16
17
18
19
20
21
22
23
24
25
26
27
28
29
30
31
32
33
34
35
36
37
38
39
40
41
42
43
44
45
46
47
48
49
50
51
52
- 启用微信服务器
在*Application启动类里加上
@EnableWeiXinServer
- 退出登录时取消绑定微信
@Override
	public void logout(boolean unbindWeiXin) {

		//要放在FrontLoginUtil.removeFrontLoginVO前
		WeiXinUser weiXinUser = WeiXinSessionUtil.getWeiXinUserFromSession();
		if (weiXinUser != null && unbindWeiXin) {
			WeiXinSessionUtil.removeWeiXinUserFromSession();
			wxuserService.unbindWeiXinUser(weiXinUser.getWxAppId(), weiXinUser.getOpenId(), weiXinUser.getUserId());
		}

		FrontLoginVO loginVO = FrontLoginUtil.getFrontLoginVO();
		if (loginVO != null) {
			FrontLoginUtil.removeFrontLoginVO(loginVO.getSessionId());
		}
	}
2
3
4
5
6
7
8
9
10
11
12
13
14
15
# 前端引入说明
- config/index.js 加上wxAppId,不加的话,当页面的code失效不会自动跳转页面登录
export default {
  rootUrl: rootURL,
  apiRoot: apiRoot,
  publickey: publickey,
  wxAppId: 'wx---------',
  debug: true
};
2
3
4
5
6
7
- store/index.js
state: {
	wxOauth: {
		wxAppId: '',
		code: ''
	}, // 微信认证
}

getters: {
	wxOauth: state => {
		return state.wxOauth;
	},
}

mutations: {
	wxOauth(state, value) {
		state.wxOauth = value;
	},
}

actions: {
	wxOauth({
		commit
	}, value) {
		commit('wxOauth', value);
	},
}
2
3
4
5
6
7
8
9
10
11
12
13
14
15
16
17
18
19
20
21
22
23
24
25
26
- (baseajax.js文件)ajax请求头加上wxAppId,code,isLogined,from
getHeader() {
		return {
			'token': Vue.prototype.$store.state.token,
			//'i18n': _this.$store.state.user.i18nLocale,
			'wxAppId': Vue.prototype.$store.state.wxOauth.wxAppId,
			'code': Vue.prototype.$store.state.wxOauth.code,
			'isLogined': Vue.prototype.$store.state.isLogined,
			'from': this.getFrom(),
			'Accept': 'application/json',
			'Content-Type': 'application/json'
		}
	},
	getFrom() {
		if (navigator.userAgent && navigator.userAgent.toLocaleLowerCase().indexOf("wechat") >= 0) {
			return "wechat"
		} else {
			return "mobile"
		}
	}
2
3
4
5
6
7
8
9
10
11
12
13
14
15
16
17
18
19
- App.vue methods:加上...mapActions(['wxOauth']),
onLaunch调用this.initWeiXin()
initWeiXin() {
	if (!this.$store.state.token) {//微信的token不为空才会自动登录
		this.$store.dispatch("setToken", this.$util.uuid())
	}
	let url = window.location.href;
	//alert(url);
	let obj = parseURL(url);
	let params = obj && obj.params;
	//alert(params.wxAppId + "-------" + params.code);
	if (params) {
		let wxAppId = params.wxAppId;
		let code = params.code;
		if (wxAppId && code) {
			let oauthParams = {
				wxAppId: wxAppId,
				code: code
			};
			this.wxOauth(oauthParams);
		}
	}
},
2
3
4
5
6
7
8
9
10
11
12
13
14
15
16
17
18
19
20
21
- (baseajax.js文件)ajax请求的响应加上跳转的处理和自动登录成功后设置setLoginInfo的处理
handleResponse(response, resolve) {
	if (response.statusCode == 200) {
		let weixinInfo = response.data.__weixin__
		if (weixinInfo) {
			if (weixinInfo.codeExpire) {
				let wxAppId = config.wxAppId
				if (wxAppId) {
					let parsedUrl = parseURL(window.location.href)
					//alert("---" + window.location.href)
					//alert("===" + JSON.stringify(parsedUrl))
					let url = parsedUrl.path + "?wxAppId=" + wxAppId
					let key
					for (key in parsedUrl.params) {
						if (key != "code" && key != "state" && key != "wxAppId") {
							url = url + "&" + key + "=" + parsedUrl.params[key]
						}
					}
					window.location.href = 'https://open.weixin.qq.com/connect/oauth2/authorize?' +
						'appid=' + wxAppId + '&redirect_uri=' + escape(url) +
						'&response_type=code&scope=snsapi_base&state=1#wechat_redirect'
				}

			} else if (weixinInfo.userInfo) {
				loginUtil.setLoginInfo(weixinInfo.userInfo)
			}
		}
		resolve(response.data)
	} else if (response.statusCode == 302) {
		//const redirect = encodeURIComponent(Vue.prototype.$route.fullPath);
		Vue.prototype.$message.toast('登录信息失效,请重新登录');
		setTimeout(() => {
			uni.navigateTo({
				url: '/pages/public/login',
				query: {
					//redirect: redirect
				}
			})
		}, 1000)
	}
},
2
3
4
5
6
7
8
9
10
11
12
13
14
15
16
17
18
19
20
21
22
23
24
25
26
27
28
29
30
31
32
33
34
35
36
37
38
39
40
- 退出时生成一个新的token(token不能为空) this.setToken(this.$util.uuid())
logout() {
				const that = this
				uni.showModal({
					title: '询问',
					content: '您确定要退出吗?',
					cancelText: '取消',
					confirmText: '确定',
					success: (e) => {
						if (e.confirm) {
							this.$ajax.post("/logout", {}).then(result => {
								if (result.success) {
									this.setIsLogined(false);
									this.setP([])
									this.setToken(this.$util.uuid())
									uni.navigateTo({
										url: '/pages/public/login'
									})
								}
							})
						}
					}
				})
			},
2
3
4
5
6
7
8
9
10
11
12
13
14
15
16
17
18
19
20
21
22
23
# 配置说明
- 后台管理系统 -> 微信 -> 微信公众号 -> 新增
Token设置复杂一点的
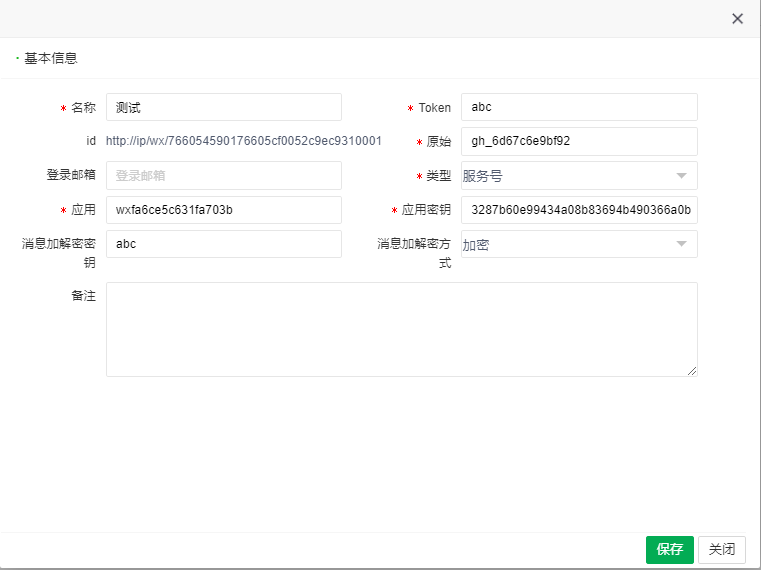
- 登录公众号管理
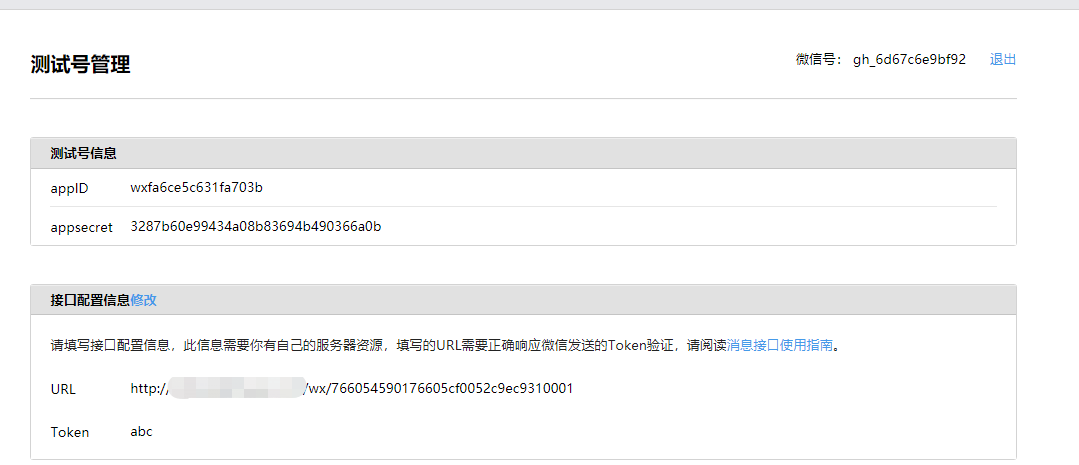
网页授权获取用户基本信息 -> 修改:填写手机h5网页的域名
# 功能组件应用流程
# show页面添加子项列表
# 可直接在列表中编辑相关信息,不需要弹开show页面
# mt-subtable 组件

<mt-card>
        <mt-toolbar style="margin-top:-5px">
            <mt-button id="createButton" icon="add" @click="addPrgroupSampleUsers" type="primary" >新增</mt-button>
        </mt-toolbar>
        <mt-subtable v-model="prgroupsampleUsers" disableAdd="1" :sortTable="true" :deleteTable="true" ref="selectTable1">
            <mt-subtable-item title="对象类型" property="objectType" type="text" width="120px" :validate="{required:true}" placeholder="对象类型"></mt-subtable-item>
            <mt-subtable-item title="对象" property="objectId" type="text" width="120px" :validate="{required:true}" placeholder="对象"></mt-subtable-item>
            <mt-subtable-item title="序号" property="showOrder" type="integer" :positive="true" :validate="{required:true}"></mt-subtable-item>
            <mt-subtable-item title="类型" property="type" type="text" width="120px" :validate="{required:true}" placeholder="类型"></mt-subtable-item>
        </mt-subtable>
</mt-card>
2
3
4
5
6
7
8
9
10
11
- 定义数组
data() {
        return {
            prgroupsampleUsers: []
        };
    },
2
3
4
5
- 以时间戳作为列表的数据下标值dataIndex
addPrgroupSampleUsers() {
            var timestamp = (new Date()).getTime();
            this.prgroupsampleUsers.push({
                dataIndex: timestamp
            })
        },
2
3
4
5
6
- 主表:工作组--prgroupsample 子表:工作组成员--prgroupsampleUser
- 后端需要在主表中关联子表数据
- domain
@Comment("子表数据")
	@Transient
	private List<PrgroupsampleUser> prgroupsampleUserList;
2
3
- 前端组装子项数据prgroupsampleUsers存到业务module对象中返回后端 this.prgroupsample['prgroupsampleUserList'] = this.prgroupsampleUsers
save() {
            if (this.$refs.showTable.validate()) {
                let type = "";
                if (!this.prgroupsample.id || this.prgroupsample.id === "") {
                    type = "create";
                } else {
                    type = "update";
                }
                this.$refs.fileList.addFileIds(this.prgroupsample)
                this.prgroupsample['prgroupsampleUserList'] = this.prgroupsampleUsers
                this.$ajax
                    .post(
                        this.$mtsampleAdmin + "/prgroupsample/" + type,
                        this.prgroupsample
                    )
                    .then(result => {
                        if (result.success) {
                            this.prgroupsample = result.prgroupsample;
                            this.$message.toast(result.message);
                            if (this.close && this.$parent.close) {
                                this.list();
                                this.$parent.close();
                            }
                        } else {
                            this.$message.error(result.message);
                        }
                    });
            }
        },
2
3
4
5
6
7
8
9
10
11
12
13
14
15
16
17
18
19
20
21
22
23
24
25
26
27
28
29
- 后端获取子项列表信息可以执行相关业务操作:
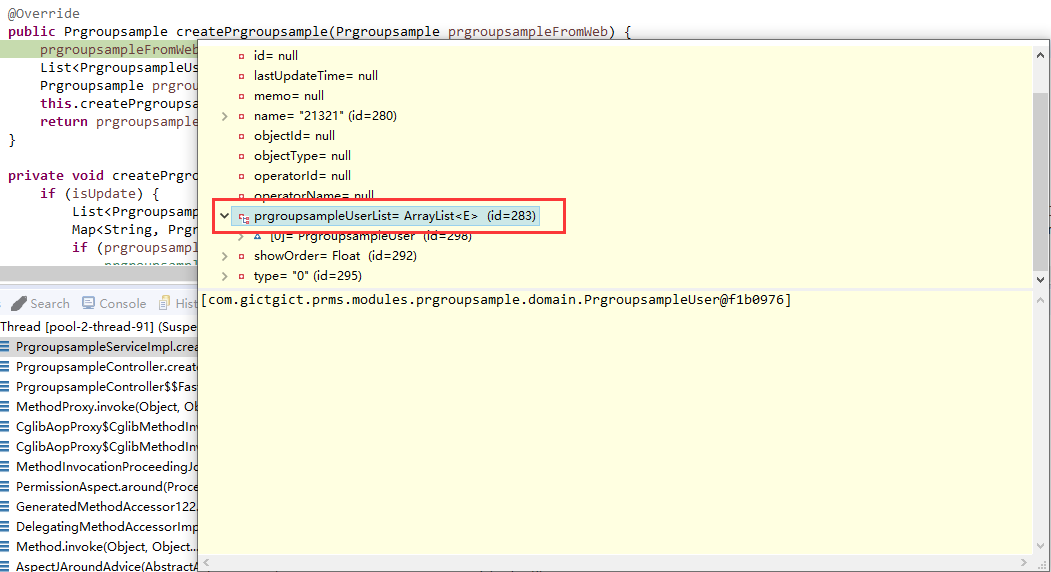
# 下拉选中,模块数据回填列表
# select下拉框,数据来源是其它模块model,选中后返回模块数据回填进列表中
# 参考例子
- 数据定义:
data() {
        return {
            close: true,
            prgroup: {
                id: ""
            },
            prgroupUsers: [],
            prgroupUserList: [],
            userId: ''
        };
    }
2
3
4
5
6
7
8
9
10
11
- 回填信息列表
<mt-card title="工作组成员" styles="padding: 5px 20px;">
        <mt-show-table columns="4">
            <mt-show-table-item label="工作组成员:">
                <mt-select v-model="userId" placeholder="工作组成员" dictCode="pruser.list" width="auto" search remote class="custom1_select"></mt-select>
            </mt-show-table-item>
            <mt-show-table-item>
                <mt-button id="initButton" icon="Add" @click="selectHandlerPrgroupUsers" type="default" class="layui-btn">添加</mt-button>
            </mt-show-table-item>
        </mt-show-table>

        <mt-list-table :listData="prgroupUserList" v-slot="model" id="table2" restHeight="600" :showSelect=false :showIndex="true" :holdScroll=true :initModel="{prgroup:{}}" :editTable="{postion:'right',delete:true,edit:true}" @editTableCallBack="editTable">
            <mt-column property="objectType" title="对象类型" width="150" :wordWrap=true>
                <mt-select v-model="model.objectType" placeholder="对象类型" dictCode="prgroup.objectType" search remote @change="getObjectType" :currentModel="model" />
            </mt-column>
            <mt-column property="type" title="类别" width="110" dictCode="pruser.type" :value="model.type" />
            <mt-column property="role" title="角色" width="150" :wordWrap=true>
                <mt-select v-model="model.role" placeholder="角色" dictCode="pruser.role" search remote @change="getRole" :currentModel="model" />
            </mt-column>
            <mt-column property="userName" title="人员" width="90" />
            <mt-column property="phone" title="电话" width="110" />
            <mt-column property="email" title="邮箱" width="90" />
            <mt-column property="sex" title="性別" width="90" dictCode="person.sex" :value="model.sex" />
        </mt-list-table>
</mt-card>
2
3
4
5
6
7
8
9
10
11
12
13
14
15
16
17
18
19
20
21
22
23
24
- 点击添加按钮后手动赋值
selectHandlerPrgroupUsers() {
            this.$util.throttle(() => {
                let userId = this.userId
                if (userId) {
                    let isAdd = true
                    let prgroupUserList = this.prgroupUserList
                    for (let i = 0; i < prgroupUserList.length; i++) {
                        let item = prgroupUserList[i]
                        if (userId == item.userId) {
                            isAdd = false
                            this.$message.error('该工作组已经添加,无须重复添加')
                            break
                        }
                    }
                    if (isAdd) {
                        this.$ajax
                            .post(
                                this.$mtsampleAdmin + "/pruser/get", {
                                    id: userId
                                }
                            )
                            .then(result => {
                                if (result.success) {
                                    let pruser = result.pruser
                                    let pruserTemp = {}
                                    pruserTemp.userId = pruser.id
                                    pruserTemp.objectId = pruser.objectId
                                    pruserTemp.objectType = pruser.objectType
                                    pruserTemp.type = pruser.type
                                    pruserTemp.role = pruser.role
                                    pruserTemp.phone = pruser.phone
                                    pruserTemp.email = pruser.email
                                    pruserTemp.sex = pruser.sex
                                    this.prgroupUserList.push(pruserTemp)
                                    this.userId = ''
                                    this.$message.toast(result.message);
                                } else {
                                    this.$message.error(result.message);
                                }
                            });
                    }
                } else {
                    this.$message.error('请先选择工作组成员')
                }
            }, 2000, 'prgroupUserList')
        }
2
3
4
5
6
7
8
9
10
11
12
13
14
15
16
17
18
19
20
21
22
23
24
25
26
27
28
29
30
31
32
33
34
35
36
37
38
39
40
41
42
43
44
45
46
47
前端组装子项数据prgroupsampleUsers存到业务module对象中返回后端
this.prgroup['prgroupUserList'] = this.prgroupUserList
save() {
            if (this.$refs.showTable.validate()) {
                let type = "";
                if (!this.prgroup.id || this.prgroup.id === "") {
                    type = "create";
                } else {
                    type = "update";
                }
                this.prgroup['prgroupUserList'] = this.prgroupUserList
                this.$ajax
                    .post(
                        this.$mtsampleAdmin + "/prgroup/" + type,
                        this.prgroup
                    )
                    .then(result => {
                        if (result.success) {
                            this.prgroup = result.prgroup;
                            this.$message.toast(result.message);
                            if (this.close && this.$parent.close) {
                                this.list();
                                this.$parent.close();
                            }
                        } else {
                            this.$message.error(result.message);
                        }
                    });
            }
        },
2
3
4
5
6
7
8
9
10
11
12
13
14
15
16
17
18
19
20
21
22
23
24
25
26
27
28
后端组装子项数据,在弹出show页面时调接口获取数据,如果id为null,需将页面prgroupUserList置空
# select下拉框选中数据回填,部分数据可自定义
# select下拉框,数据来源是其它模块model,选中后返回模块数据回填进列表中,列表中部分数据源数据下拉从字典库中获取
- 下拉框显示完整数据,需要添加 :wordWrap=true
<mt-column property="objectType" title="对象类型" width="150" :wordWrap=true>
        <mt-select v-model="model.objectType" placeholder="对象类型" dictCode="prgroup.objectType" search remote @change="getObjectType" :currentModel="model" />
</mt-column>
2
3
getObjectType(id, item, row) {
            let data = this.prgroupUserList
            data.forEach(element => {
                if (row.id == element.userId) {
                    element.objectType = item.id
                }
            })
            this.prgroupUserList = {}
            this.prgroupUserList = data
        }
2
3
4
5
6
7
8
9
10
# list-table列表自定义编辑
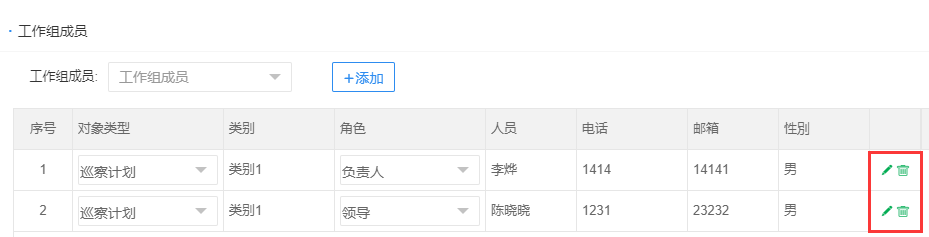 :editTable="{postion:'right',delete:true,edit:true}" @editTableCallBack="editTable"
<mt-list-table :listData="prgroupUserList" v-slot="model" id="table2" restHeight="600" :showSelect=false :showIndex="true" :holdScroll=true :initModel="{prgroup:{}}" :editTable="{postion:'right',delete:true,edit:true}" @editTableCallBack="editTable">
            <mt-column property="role" title="角色" width="150" :wordWrap=true>
                <mt-select v-model="model.role" placeholder="角色" dictCode="pruser.role" search remote @change="getRole" :currentModel="model" />
            </mt-column>
            <mt-column property="userName" title="人员" width="90" />
            <mt-column property="phone" title="电话" width="110" />
            <mt-column property="email" title="邮箱" width="90" />
            <mt-column property="sex" title="性別" width="90" dictCode="person.sex" :value="model.sex" />
</mt-list-table>
2
3
4
5
6
7
8
9
- 点击编辑按触发事件
- 删除事件组件已封装,默认删除的是行数据
- 编辑事件可调用自定义editTable方法,type为"edit",object为行数据
- 选中列表的行数据
editTable(type, b) {
            if (type === "edit") {
            //需要执行操作
            }
        }
2
3
4
5
# 树形结构展示数据
# 树形结构功能模块
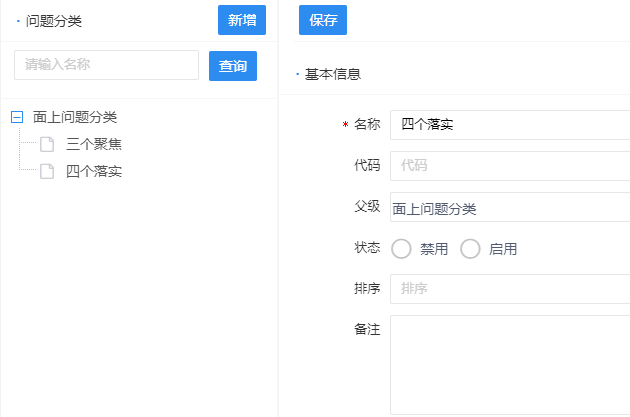
- 编辑show页面需要嵌套在list列表里
- 需添加参数type="inListPage"
<template>
    <mt-listContent>
        <mt-card title="问题分类" styles="padding: 1px 1px" postion="left">
            <mt-search-table @search="list" width="217" container="tree">
                <mt-search-item v-model="searchMap.name"  placeholder="请输入名称" type="text" operate="li" labelWidth="35" styles="padding-right: 1px"></mt-search-item>
            </mt-search-table>
            <template v-slot:button>
                <mt-button id="initButton" permission="prissuetype.save" @click="init">新增</mt-button>
            </template>
        </mt-card>
        <mt-tree :url="this.$mtsampleAdmin + '/prissuetype/list'" ref="prissuetypeList" @select="show" :edit="['del']" @edit="operate"/>
        <mt-toolbar classes="list-tree-toolbar-top" :cssstyle="{padding: '5px 1px 6px 5px'}">
            <mt-button id="saveButton" icon="save" permission="prrectificationtype.save" @click="save">保存</mt-button>
        </mt-toolbar>
        <mt-show type="inListPage">
            <prissuetype-show ref="prissuetypeShow" @list="list" />
        </mt-show>
    </mt-listContent>
</template>
2
3
4
5
6
7
8
9
10
11
12
13
14
15
16
17
18
19
- 弹出show页面选择关联自定义的数据节点,需要自定义数据源
data() {
        return {
            close: true,
            prissuetype: {
                id: ""
            },
            parentTypesTree: []
        };
    }
2
3
4
5
6
7
8
9
<mt-show-table-item label="父级">
        <mt-select v-model="prissuetype.parentId" :dictData="parentTypesTree" :tree="{idField: 'id', parentIdField: 'parentId', valueField:'name', checkbox: false}" />
</mt-show-table-item>
2
3
- 弹出show页面时,需要自定义接口,返回所有节点信息
this.$ajax
                .post(this.$mtsampleAdmin + '/prissuetype/listNoChildNode', {
                    id: id,
                })
                .then((result) => {
                    if (result.success) {
                        this.parentTypesTree = result.data
                    } else {
                        this.$message.error(result.message, '提示')
                    }
                })
            this.$parent.show();
2
3
4
5
6
7
8
9
10
11
12
# 其它模块module需要调用树形数据字典项关联
- 问题模块下拉框选择问题类别的数据
<mt-show-table-item>
       <mt-select v-model="prissue.type" placeholder="问题类别" dictCode="prissuetype.list" remote :validate="{required: true}" :tree="{idField: 'key', parentIdField: 'parentKey', checkbox: false}"></mt-select>
</mt-show-table-item>
2
3
- 在问题类别模块prissuetype的xml文件配置字典项
- 可以指定数据字典的key、value值,不指定默认key="id",value="name"
<dict code="prissuetype.list" name="问题分类" memo="" service="prissuetypeService.listPrissuetype(Map paramMap)"/>
- Service层接口定义:
@Override
public List<Prissuetype> listPrissuetype(Map searchMap) {
	return prissuetypeRepository.list(new Query("id, name").fromMap(searchMap));
}
2
3
4
- 在字典管理里手动指定parentKey值,需要在字典管理里添加问题分类父级id的字段名称
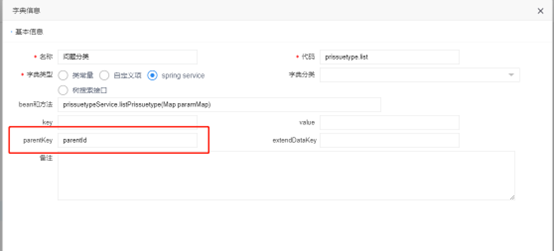
# 字典项联动
- 工作组关联人才库信息,下拉选中userId,回填所有信息。
- 定义数据
data() {
        return {
            close: true,
            prgrouptest: {
                id: "",
                phone:'',
                email:'',
                sex:''
            },
            userIdParams: {'flag': "true"},
        };
    },
2
3
4
5
6
7
8
9
10
11
12
- show页面
<template>
<mt-show-content title="工作组test">
    <mt-toolbar :cssstyle="{postion: 'bottom',textalign: 'right'}">
        <mt-button id="saveButton" icon="save" type="primary" @click="save">保存</mt-button>
        <mt-button id="closeButton" icon="close" @click="this.$parent.close" type="normal">关闭</mt-button>
    </mt-toolbar>
    <mt-card title="基本信息">
        <mt-show-table ref="showTable" columns="1">
            <mt-show-table-item label="名称">
                <mt-input v-model="prgrouptest.name" placeholder="名称" :validate="{required:false, maxlength:255}" />
            </mt-show-table-item>
            <mt-show-table-item label="类型">
                <mt-select v-model="prgrouptest.type" placeholder="类型" dictCode="prgroup.type" :validate="{required:false, maxlength:255}" search />
            </mt-show-table-item>
    </mt-card>
    <mt-card>
        <mt-show-table-item label="关联成员">
            <mt-select v-model="prgrouptest.userId" placeholder="关联成员" dictCode="pruser.list" :validate="{required:true, maxlength:255}" :params="userIdParams" search />
        </mt-show-table-item>
        <mt-show-table-item label="手机">
            <mt-input v-model="prgrouptest.phone" placeholder="手机" disabled="disabled" />
        </mt-show-table-item>
        <mt-show-table-item label="邮箱">
            <mt-input v-model="prgrouptest.email" placeholder="邮箱" disabled="disabled" />
        </mt-show-table-item>
        <mt-show-table-item label="性别">
            <mt-select v-model="prgrouptest.sex" :validate="{required: true}" dictCode="person.sex" placeholder="性别" disabled="disabled" width="auto" search />
        </mt-show-table-item>
    </mt-card>
</mt-show-content>
</template>
2
3
4
5
6
7
8
9
10
11
12
13
14
15
16
17
18
19
20
21
22
23
24
25
26
27
28
29
30
31
- 在watch中监听下拉框userId值的变化
watch: {
        'prgrouptest.userId': {
            handler: function (newValue, oldValue) {
                if (newValue) {
                    this.onChangeUser(newValue)
                }
            }
    }
    }
2
3
4
5
6
7
8
9
- 调用关联模块接口将数据存进对象中
onChangeUser(value, item) {
            let params = {id: value}
            this.$ajax.post(this.$mtsampleAdmin + "/pruser/get",
                    params).then(result => {
                        if (result.success) {
                            let prgrouptest = this.prgrouptest
                            prgrouptest.userId = result.pruser.id
                            prgrouptest.sex = result.pruser.sex
                            prgrouptest.phone = result.pruser.phone
                            prgrouptest.email = result.pruser.email
                            this.prgrouptest= Object.assign({},prgrouptest)
                        } else {
                            this.$message.error(result.message)
                        }
                    });
        }
2
3
4
5
6
7
8
9
10
11
12
13
14
15
16
# 列表操作栏添加启用、禁用状态栏
- 按钮
<mt-button id="initButton2" @click="changeStatus" :rowdata="model" v-if="model.status == '0' || model.status == '1'" :value="model.status" type="none" permission="itdevice.save">
        <template v-if="model.status=='0'">启用</template>
        <template v-else>停用</template>
</mt-button>
2
3
4
- 点击事件
changeStatus(row, status) {
            this.$message.confirm("是否修改启用状态?", "确认", () => {
                let params = {}
                params['status'] = (status === '0' ? '1' : '0')
                params['id'] = row.id
                this.$ajax.post(this.$mtsampleAdmin + '/itdevice/status', params).then(result => {
                    if (result.success) {
                        row['status'] = params.status
                        this.$message.toast(result.message)
                    } else {
                        this.$message.error(result.message)
                    }
                })
            })
        }
2
3
4
5
6
7
8
9
10
11
12
13
14
15
- 接口示例:
controller
@PostMapping("/status")
	@ResponseBody
	public String status(@RequestBody Map map) {
		String status = (String)map.get("status");
		String id = (String)map.get("id");
		itdeviceService.updateStatus(id, status);
		return this.newJson().setSuccessMessage("修改成功").toJsonString();
	}
2
3
4
5
6
7
8
Service
@Override
	@Transactional(rollbackFor = Exception.class)
	public void updateStatus(String id, String status) {
		itdeviceRepository.updateProperty(id, "status", status, Itdevice.class);
	}
2
3
4
5